Workload Calculation and Color Coding
Please read the article Essential settings for the workload first, so that you know which InLoox Account Settings you need to configure.
Calculation Basis
InLoox uses the following data to calculate the resource utilization:
- Calendar of the persons
- Effort of the task(s) of the assigned person
- Start and end date of the task, or start and end date of the activity assigned to the task, or start and end date of the project (if the task has no start/end date and is not assigned to any activity)
Additionally, you can optionally include the following data in the workload calculation using filters:
- Outlook appointments of people (optional)
- Project requests (optional)
- Completed tasks of the people (optional)
Flexible Filter Options
With the filter options, you can control the workload calculation even more precisely. Using sliders, you can specify whether project requests and Outlook appointments should be included or excluded, and which projects with specific status values (e.g. Started) should be taken into account.
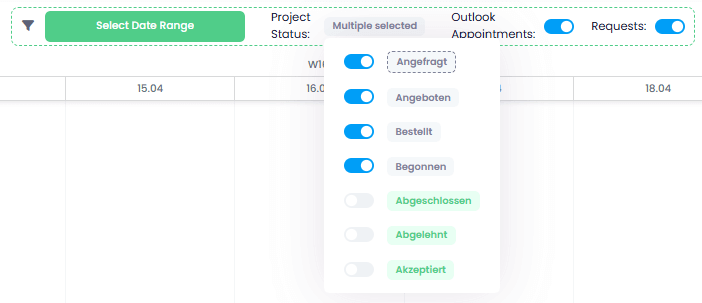
Levels in the Workload View
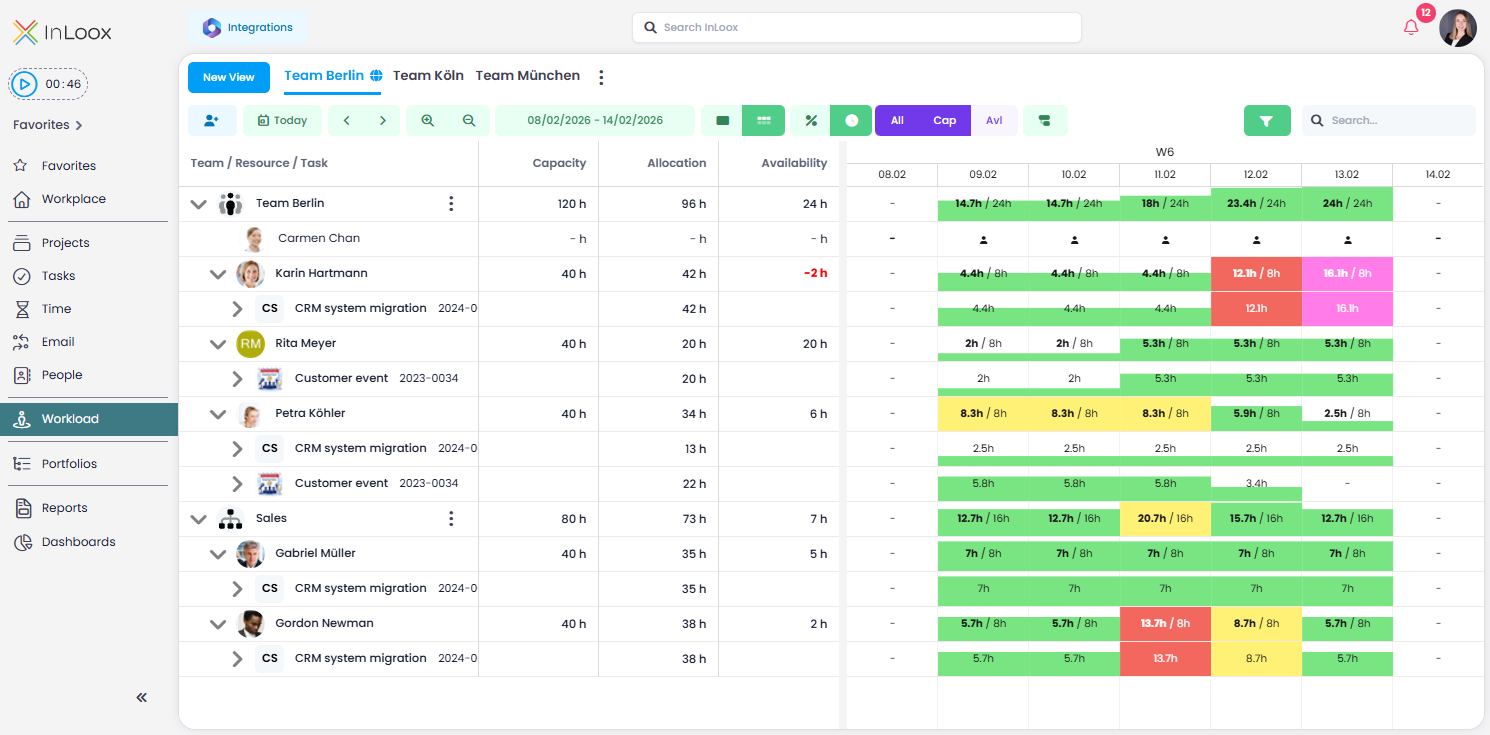
In the workload view itself you will find different levels:
- Division & team level: Here you can see the total utilization of all persons assigned to a specific division or team. You can create teams manually in the workload view, and you can create a division in the InLoox Account Settings under Organization > Divisions. Read more details under Teams and Divisions.
- Person level: Here you can see the total utilization of the resource (person). The intuitive level indicator helps you to see the level of workload at a glance.
- Project level: Here you can see the assignment of the resource to various projects as well as the total workload across the individual projects.
- Task level & Outlook appointments: If you are interested in detailed project information, you can further expand the projects and see the individual tasks including effort in hours for each task. Additionally, InLoox offers an extended integration with your personal Outlook account for the workload. The synchronized appointments are displayed in the workload in the line Outlook appointments. These appointments only contain information about start, end and therefore also the duration (corresponds to the effort) of the appointment. Other details like subject and description of the appointment are not relevant in the workload and will not be displayed.
The Outlook integration requires an active connection between your Microsoft 365 account and InLoox — you can set this up in the essential settings.
To avoid having to expand/collapse the levels manually, use the Expand/Collapse Levels button in the navigation bar and choose between Teams & Divisions, People, Projects, or Tasks & Events. This allows you to switch to the desired level of detail for all resources at once, which is particularly helpful for larger resource planning tasks.
Columns in the Workload View
The following columns are displayed by default in the workload view:
- Capacity: Based on the selected calendar of the resource, this column shows how many working hours are generally available, e.g. 40 hours per week.
- Allocation: Shows how many working hours are already scheduled, e.g. due to the effort required for assigned tasks or Outlook appointments.
- Availability: Shows how many working hours are still available.
For the calendar view itself, you can choose between the following display units:
- Show percentage: The utilization is shown as a percentage of the capacity.
- Show hours: The utilization is shown in absolute values (hours). The three purple buttons for allocation, capacity, and availability can then be used to make precise forecasts about how much capacity is still available in the coming months, for example. For more details about the buttons in the navigation bar, see Navigation, Details and Sharing.
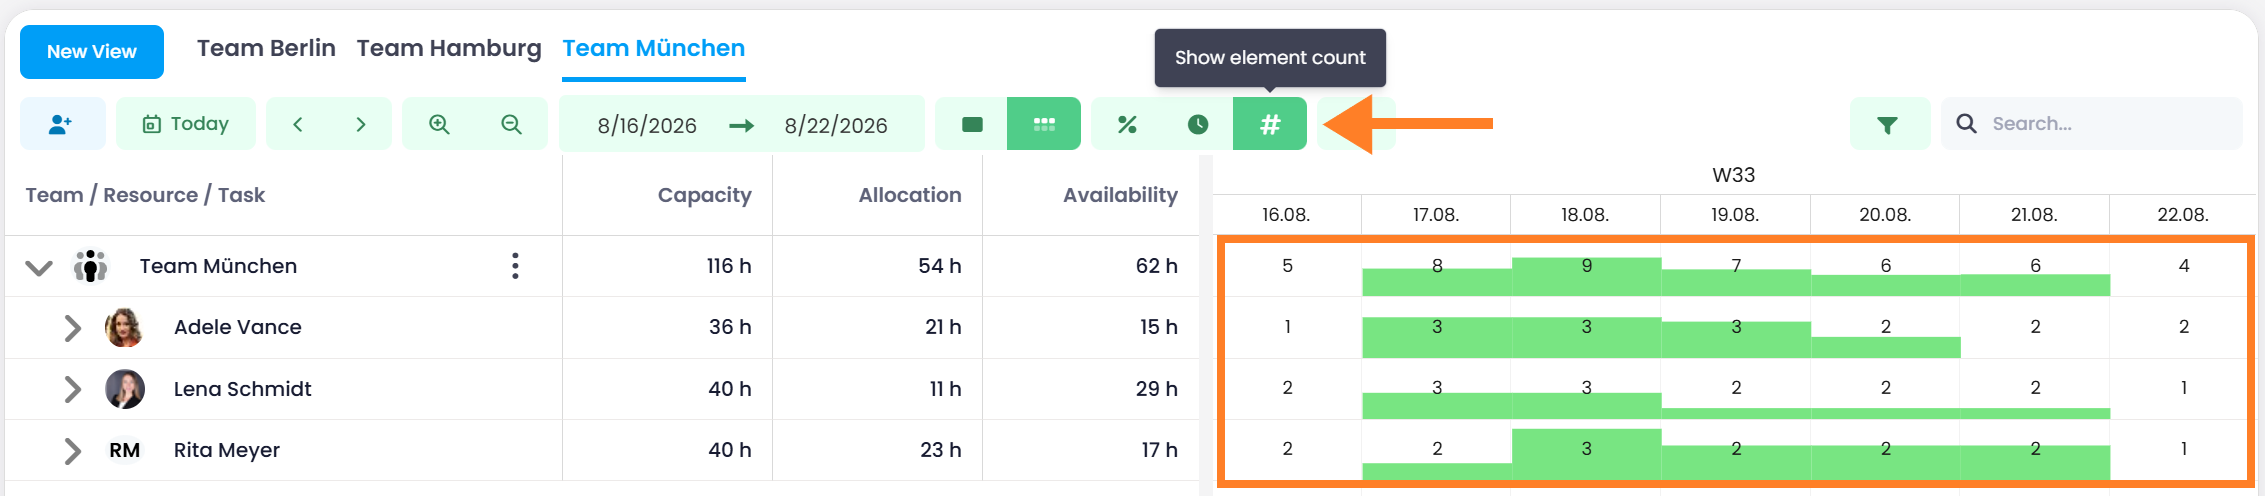
- Show element count : The element count gives teams that do not estimate their tasks in hours an overview of how the work is distributed.
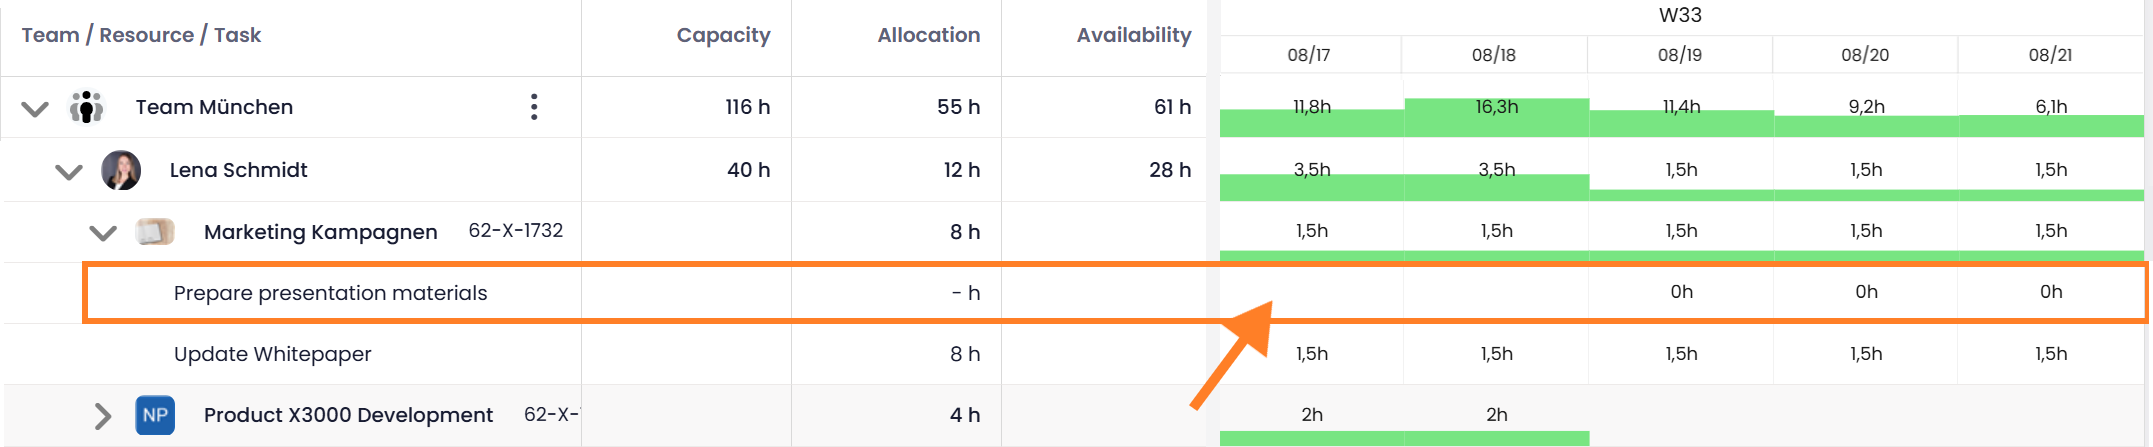
If a task is scheduled in a period but has no planned effort, the field shows 0 h or 0 %, depending on the selected display unit. A field stays empty only when nothing is scheduled in that period. On the task level, such a task is listed with – h in the Allocation column and does not count towards the allocation of the resource.
Color Coding
InLoox reports working days as overbooked if the effort exceeds the working time. Based on the calendar assigned to the resource, days are color-coded as follows:
- Green — Capacity available, allocation under or at 100%
- Yellow — Allocation between 101–150%
- Red — Allocation between 151–199%
- Pink — Allocation at or above 200%
The effort of the assigned tasks is distributed linearly to the working days in the period according to the time frame that InLoox calculates either from the start/end date of the task, the assigned activity, or the project.
The task "Create presentation" has an effort of 5 hours. The start date is today at 2:00 PM and the end date is tomorrow at 11:00 AM. InLoox distributes the effort evenly, allocating 2.5 hours to today and 2.5 hours to tomorrow. Since the working time calendar defines working hours from 8:00 AM to 4:00 PM, today is booked at 37.5% and the following day is also booked at 37.5%. There is still capacity available on both days. The resource can take on additional tasks with a total effort of up to 5.5 hours before reaching 100% capacity.
Display of Absences
InLoox marks absences in the workload overview with on resource rows.
In order for that to work, you need to add work-free days to calendars or individual people in the InLoox settings. Read the help article on defining working hours, calendars and days off for more details.
The color of the icon tells you whether the absence is free of conflicts:
- Absence icon in black — The resource is absent during this period and has no task assignments scheduled within it. Hover over the icon to see the tooltip "This resource is absent".
- Absence icon in red — The resource is absent during this period but has at least one task assignment that overlaps with it. Hover over the icon to see the tooltip "This resource has bookings during their absence". Use this as a signal to reschedule the affected tasks or redistribute them to other resources.

The further you zoom out, the less space is available per column, so InLoox reduces the marking step by step. In the calendar week display, on a light red background takes the place of the absence icon. At a coarser scale, only the light red background remains. The meaning stays the same in both cases: somewhere in this period, the resource is scheduled during an absence. In the month display, the marking is no longer shown — zoom in using the magnifying glasses in the navigation bar to identify the affected days.