25 posts tagged with "area:settings"

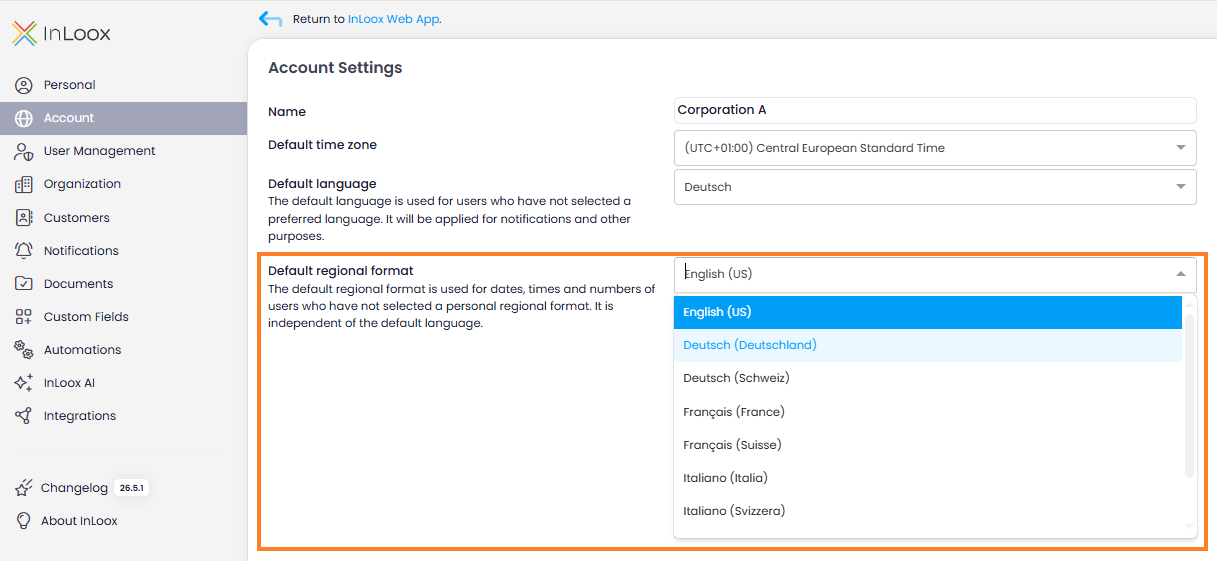
Account and system settings

View All Tags

Use Your Own AI Model with InLoox

AI in InLoox Self-Hosted for the first time: The AI features used to be reserved for the cloud editions, because the default model runs in the InLoox Cloud only. With a model of your own, the full range of features is now available in a self-hosted installation as well:

  • Generate project tasks from a short description
  • Identify tasks in emails, both in the web app and in the Outlook add-in
  • Have project descriptions written for you

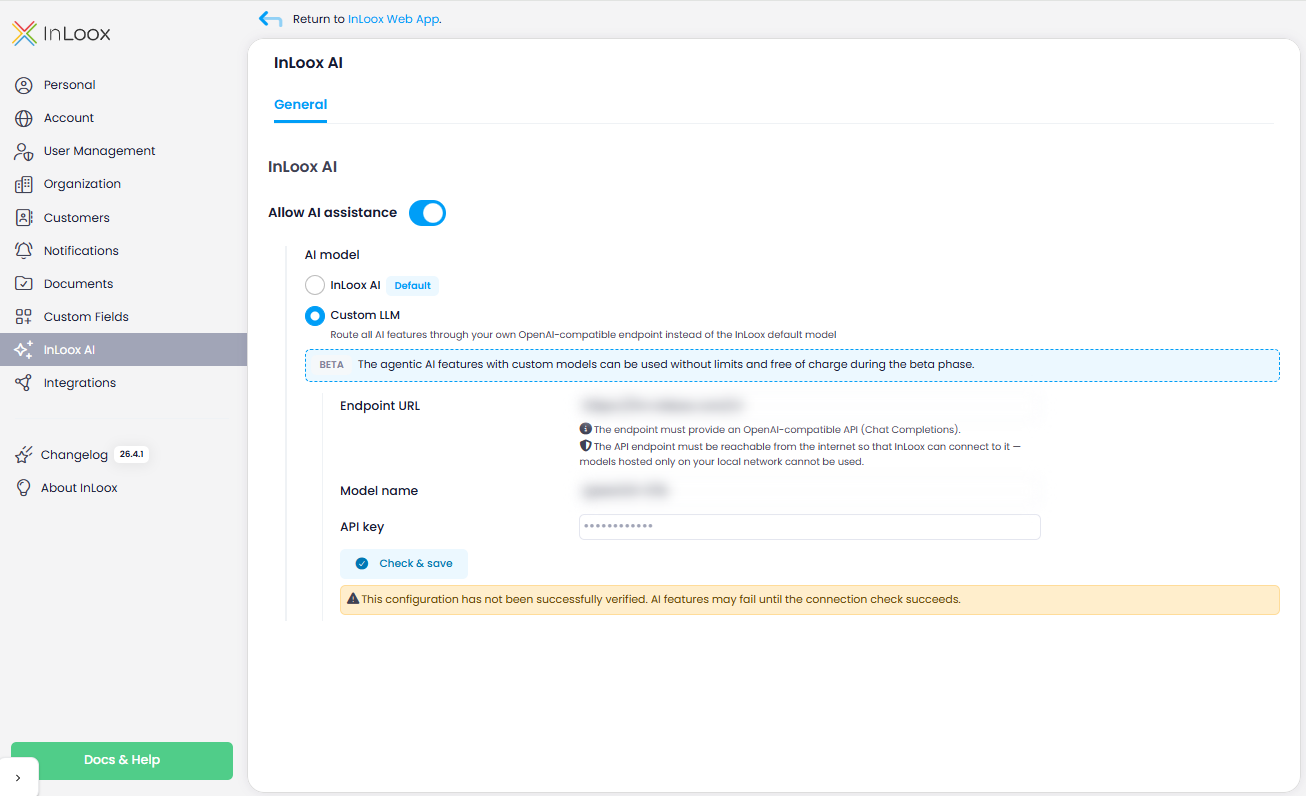
To do so, register your own OpenAI-compatible endpoint in the new InLoox AI area of the Account Settings, which the cloud editions can do just as well if they prefer not to use the default model. Every AI feature then runs through that model, so you determine which provider is used and under which terms your data is processed. The same area is where you allow or block AI support for your account as a whole.

InLoox AI settings

Beta feature

Connecting your own model is released as a beta feature in InLoox 26.5. The range of functions and the configuration options may still change.

note

The endpoint must provide an OpenAI-compatible API (Chat Completions). In the cloud editions it must be reachable from the internet, in InLoox Self-Hosted from the application server that runs InLoox. Configuring InLoox AI requires administrator permissions.

Help articles: InLoox AI · InLoox AI Assistant

New Section: Organizations

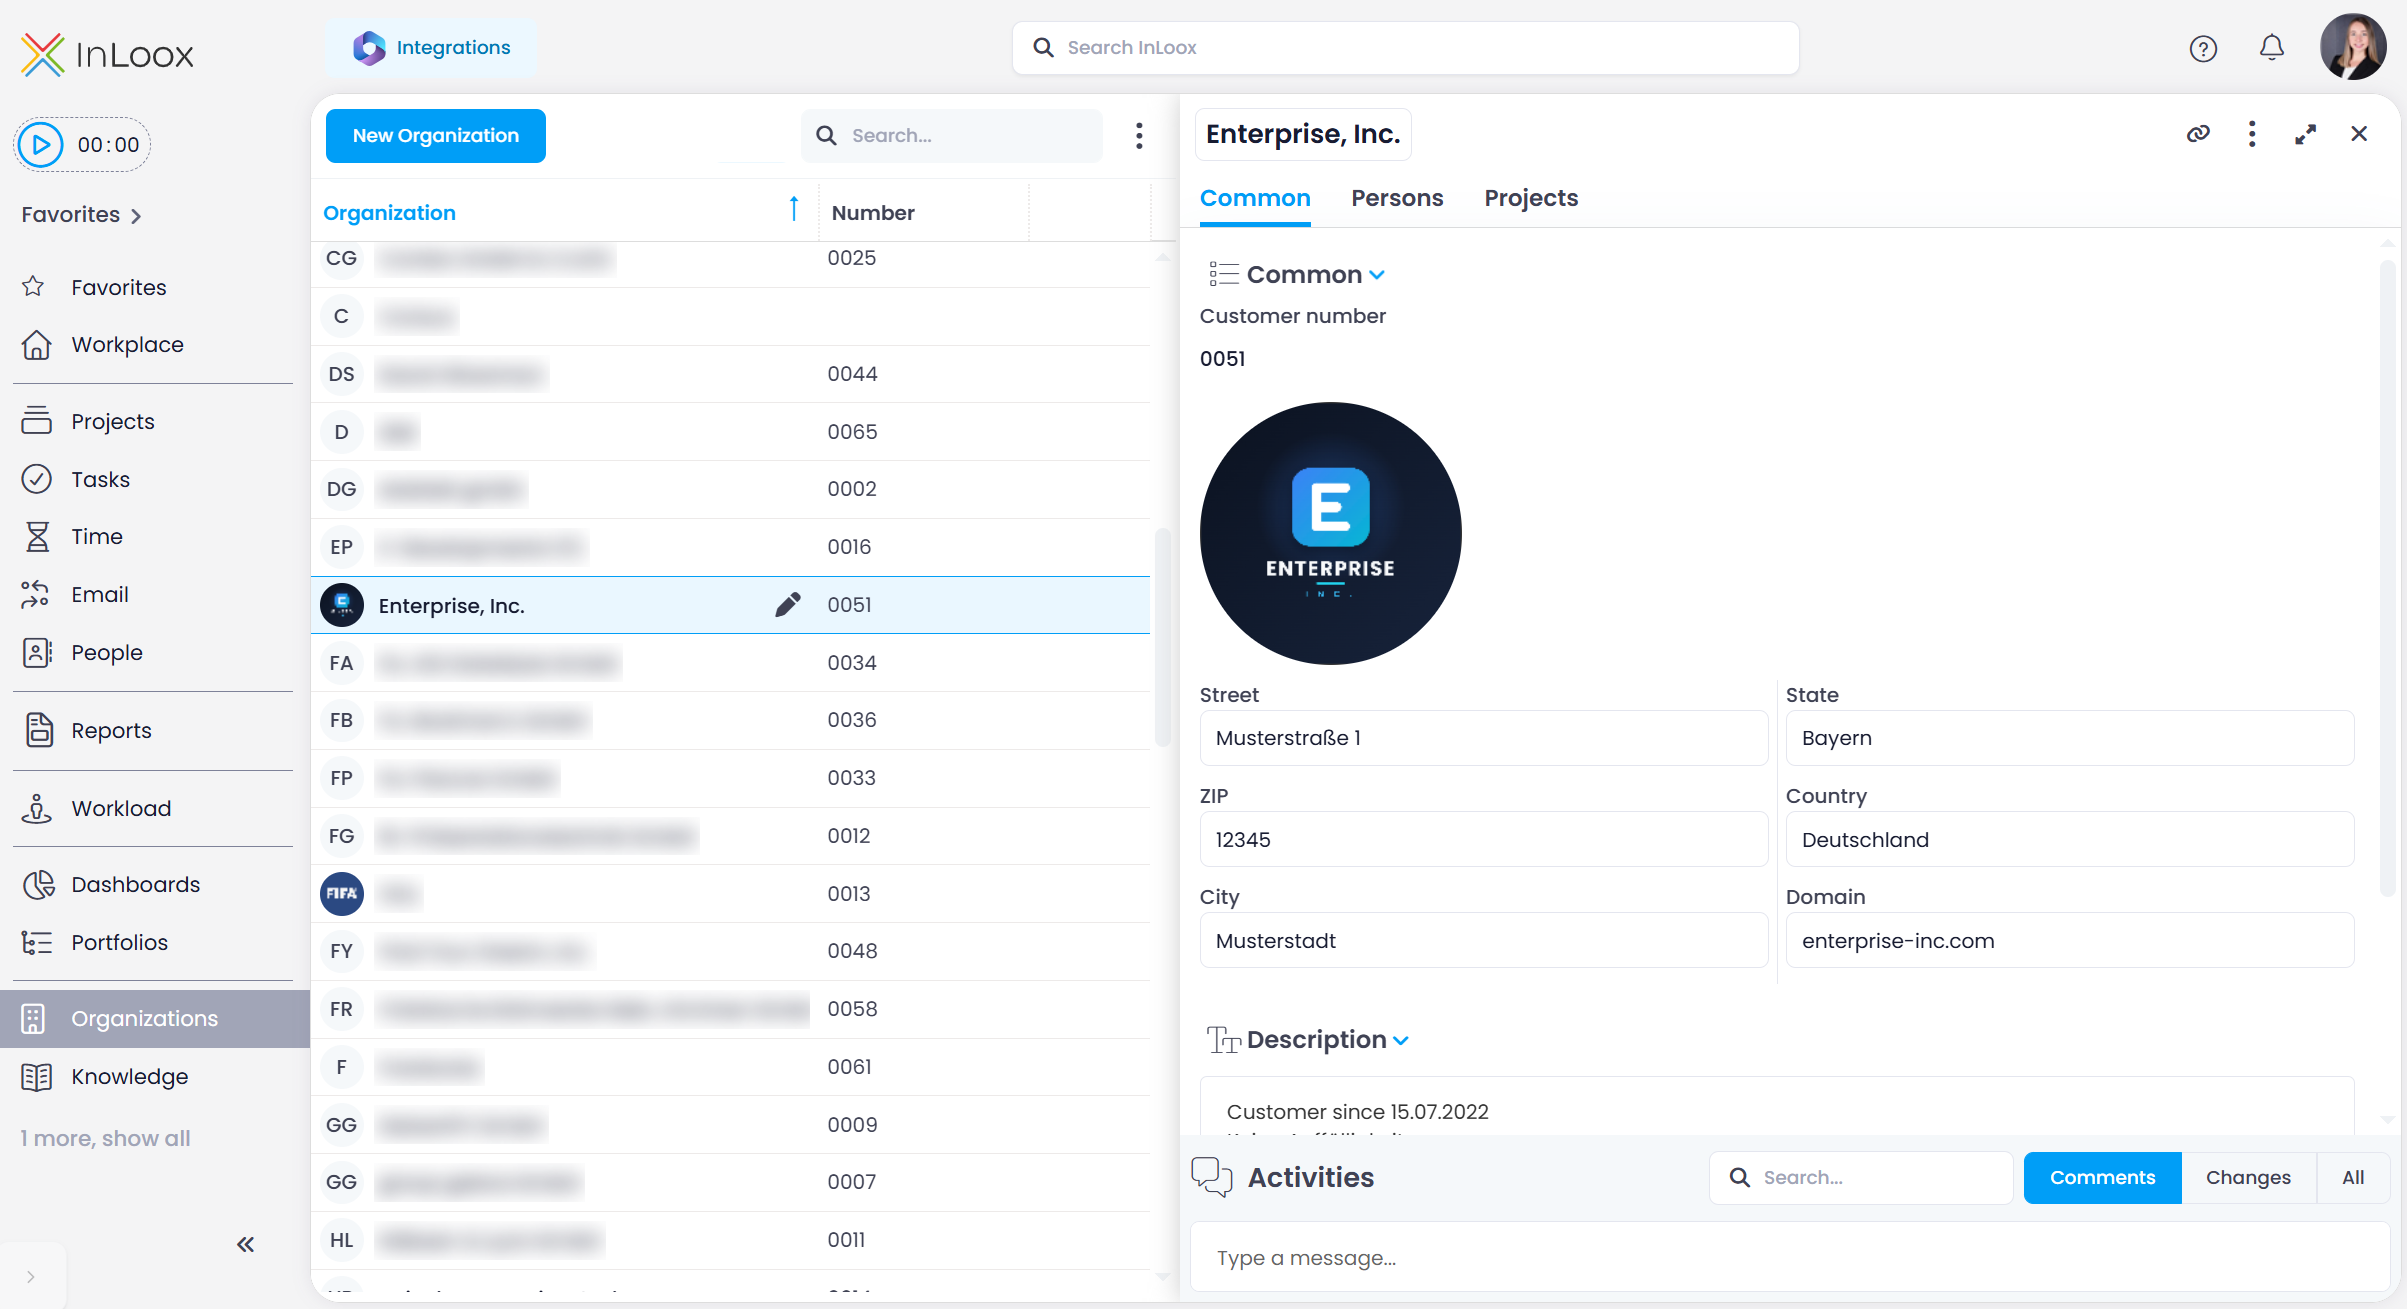
Everything about a customer or partner in one place: the new Organizations section replaces the former Clients area and gives every company, customer, or partner a detail view of its own, with contacts, projects, and history.

Each organization has a dedicated detail view with three tabs:

  • General: Name, number, address, domain, and description, plus linked items and the activity feed with comments and change history.
  • Persons: All contacts assigned to the organization.
  • Projects: All projects the organization is linked to.

Like any other list view, the Organizations list can be filtered, sorted, grouped, and saved as a customized view. Custom fields and multi-editing are supported as well.

Organization detail view

note

Access is controlled by three global permissions:

  • Read organizations
  • Create, edit and delete organizations
  • Create organizations on the project manage page

The third one is meant for project managers who need to create an organization that does not exist yet in the Customers field on the Manage page, without receiving rights on the entire Organizations section.

Help article: Organizations

Planning Templates: Save Privately, Publish Deliberately

Not every template is meant for everyone. You now decide who can use a planning template: a newly saved template is private and visible only to you, and you then release it deliberately to the people and groups that actually work with it. Previously, every saved template was immediately available to everyone in the account.

Three levels of publication are available:

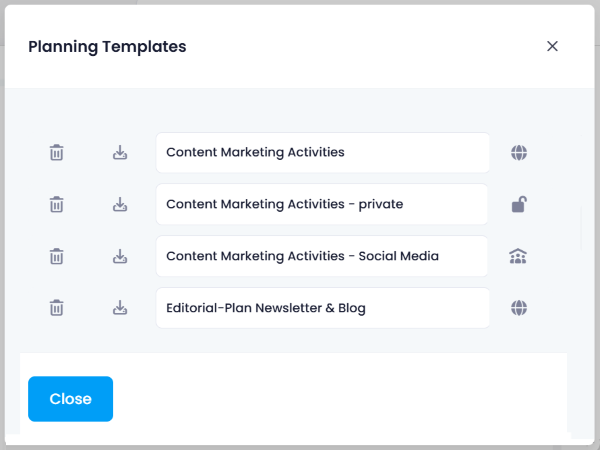
  • Private (not published): Only you can see and use the template.
  • Entire Organization: Everyone in your account can see and use the template.
  • Specific departments, groups and persons: Only the recipients you select can see and use the template.

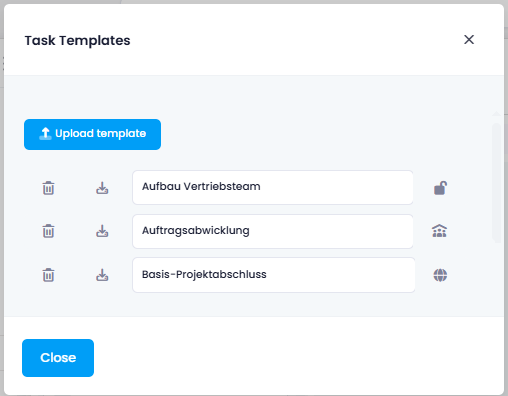
Under Manage templates, an icon next to each template shows its current publish status at a glance. A different owner can be assigned as well.

Planning templates with publish status

note

Publishing requires the Publish templates permission. All templates that already existed in your account were set to Entire Organization with the update, so they remain visible to everyone as before.

Coming next

This concept starts with planning templates. In upcoming versions, InLoox will roll it out step by step to the other areas that work with templates.

Help article: Planning Templates

New Permission: Read Task Comments

Discussions on a task are often more sensitive than the task itself. The new permission Read task comments lets you separate the two, so you can involve people in the work without opening up internal conversations: without the permission, a user can still open and work on the task, but its comments are not displayed.

Assign or revoke the permission in Account SettingsUser Management. It can be set as a global user permission, as a department permission, or through role permissions.

Help articles: Comments · Permissions

Custom Fields: New Person Type

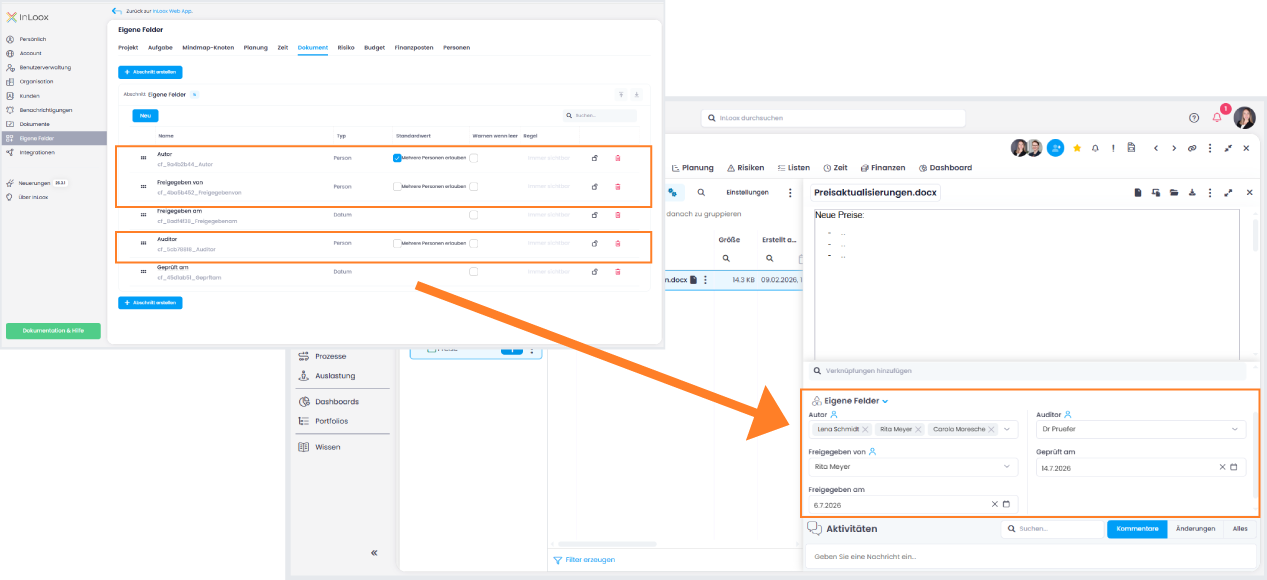
A new Person type is now available for custom fields. It lets you assign one or more persons from your InLoox contacts directly to projects, tasks, or any other item that supports custom fields.

Typical use cases include assigning a responsible contact, linking a key account manager to a project, or recording a reviewer for a document.

When creating a Person field, you can enable Allow Multiple Persons to let users select more than one contact. The selected persons are displayed with their profile picture and name.

New custom field type Person

note

Person custom fields are for displaying involved persons only — they do not replace project members or task resources. Persons entered in custom fields do not receive notifications.

Help article: Custom Fields

Note: Custom fields are not available in the InLoox Professional Edition.

Custom Fields: Multi-Select and Range

Two new custom field types are now available:

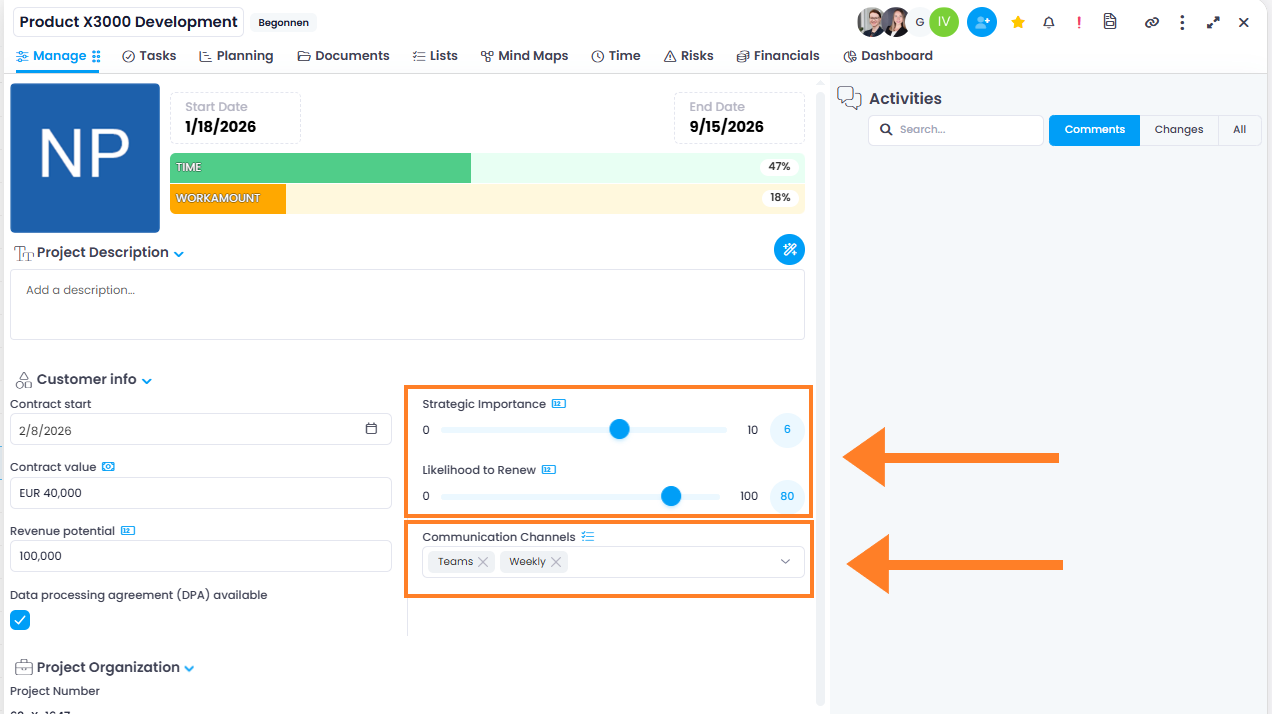
  • Multi-Select — Tag items with multiple values from a predefined list. Values are displayed as tags. If the Allow to add new item option is enabled in the field settings, users can also add new values directly in the field.
  • Range — Select a numeric value using a slider within a defined minimum and maximum, for example as a scale or percentage.

Multi-Select and Range custom fields

The new field types are ideal for classifications, ratings, or prioritizations and are available in all areas that support custom fields.

Help article: Custom Fields

Note: Custom fields are not available in the InLoox Professional Edition.

Custom Fields: Better Clarity with Sections

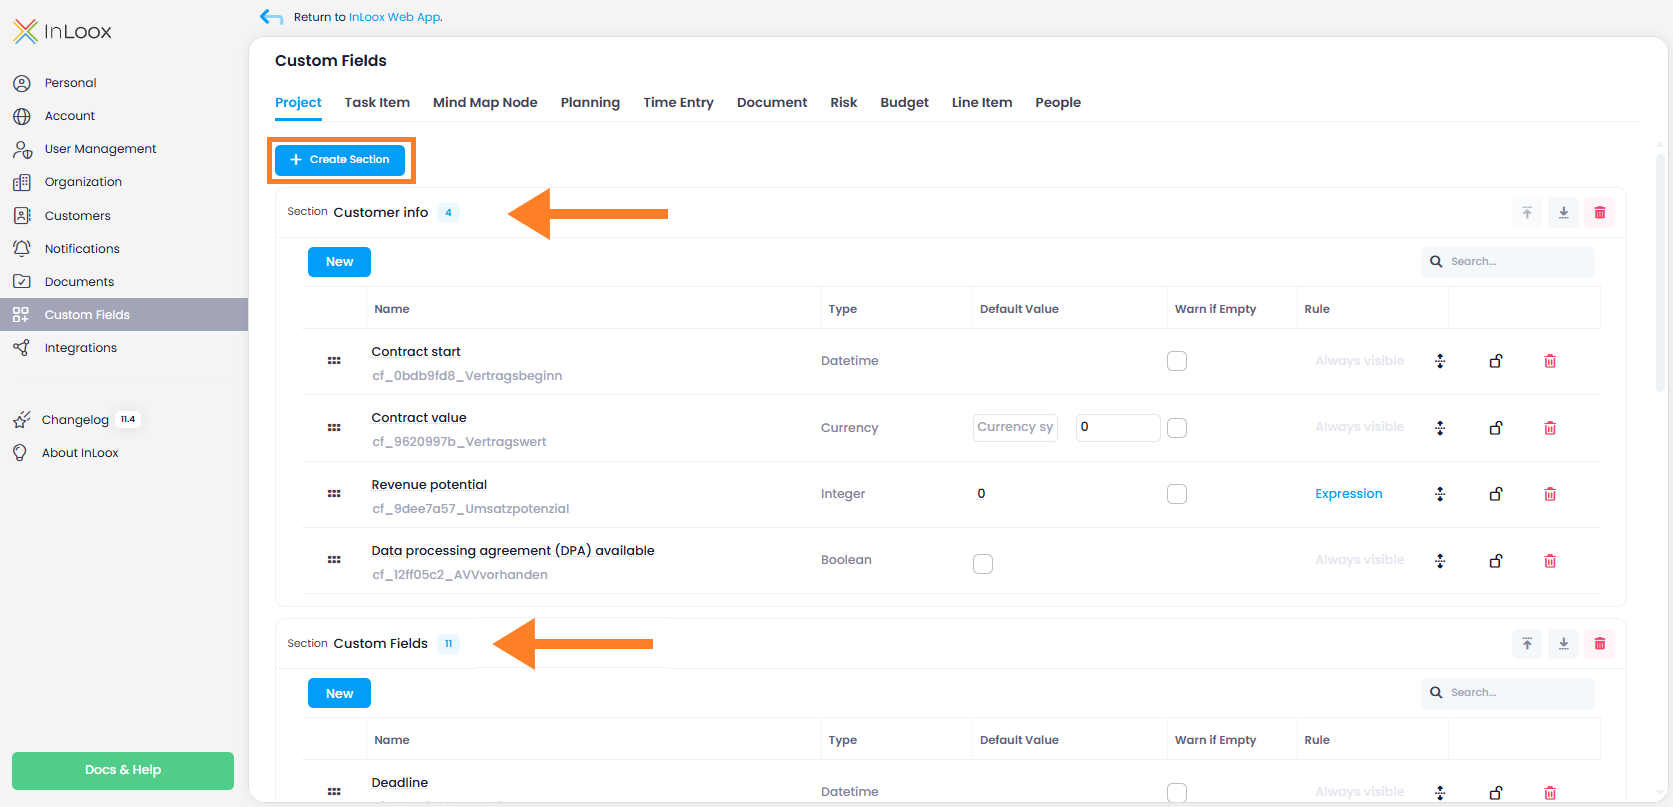
You can now organize custom fields into named sections. Sections group related fields together under a clear heading in the side panel, making it easier to find and fill in the right fields.

In the Account Settings, you can create, rename, sort, and delete sections. Fields can be moved between sections and rearranged using drag and drop. Note: Administrator rights are required for this.

Custom fields organized into sections

Note: Custom fields are not available in the InLoox Professional Edition.

People: New Read Permissions for More Control

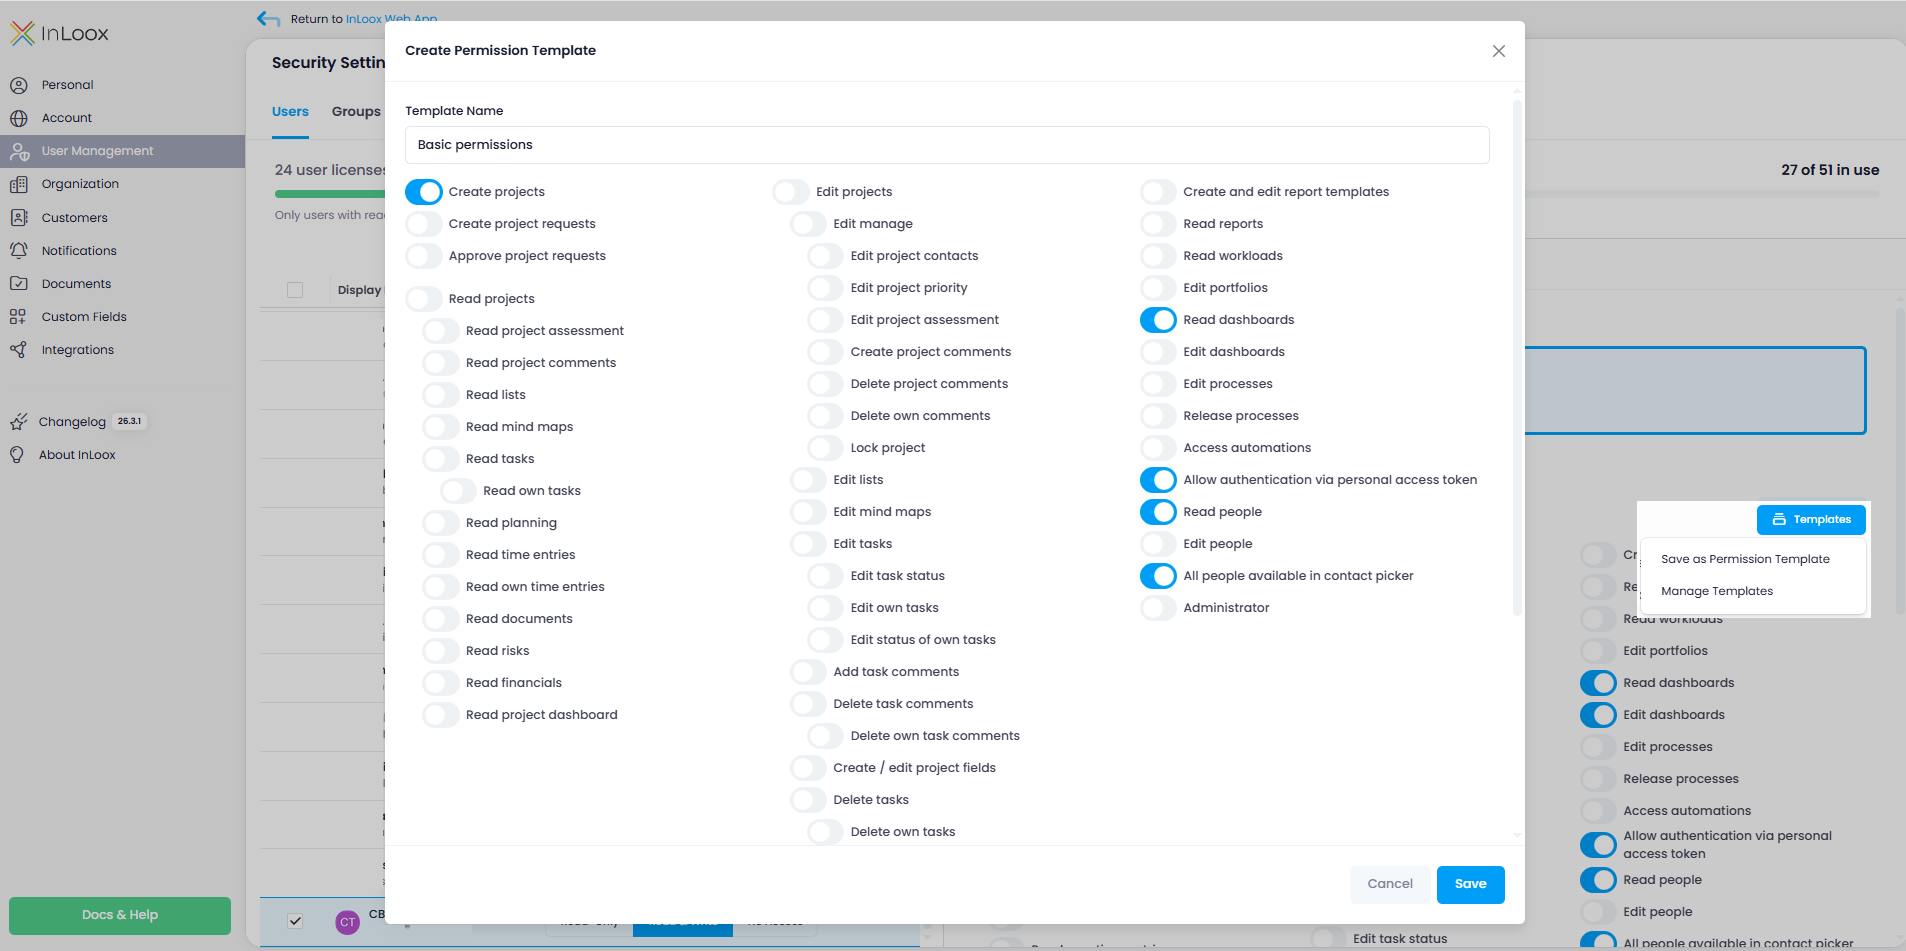
New global permissions let you control access to the People section more precisely:

  • Read people — Controls whether a user can see the People section. If disabled, the section is completely hidden.
  • Edit people — Controls whether a user can edit contact entries. Without this permission, users can only manage their own availability.
  • All people available in contact picker — Controls whether a user can see all contacts when adding project members.

These permissions are configured in the Account Settings under User Management. Administrator rights are required.

Help article: People & Contacts

Security: Require Two-Factor Authentication for All Users

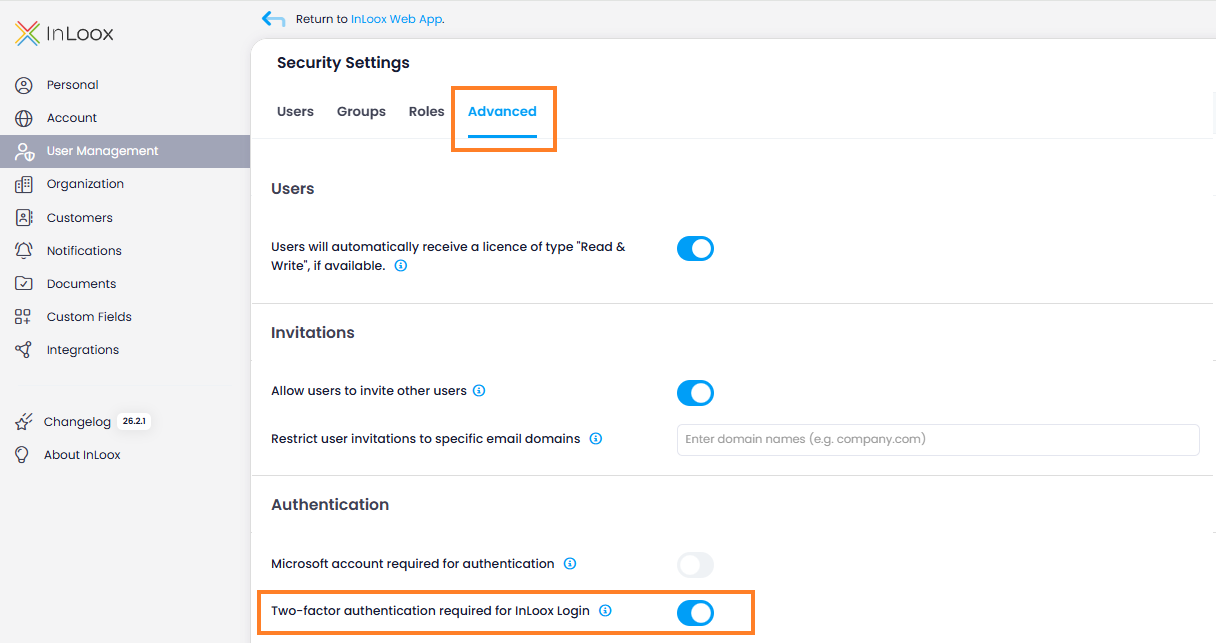
In addition to the option of requiring login via Microsoft 365, an alternative security option is now available for organizations without Microsoft login: mandatory two-factor authentication (2FA) for the entire InLoox account.

Administrators can require that only users with 2FA enabled are allowed to log in to InLoox. The setting is located in the Account Settings under User Management > Advanced. Activate the toggle Two-factor authentication required for InLoox Login.

Two-factor authentication setting in User Management — Advanced tab

For two-factor authentication, users can choose between a verification code via email or an authenticator app. Users who sign in via Microsoft 365 are automatically exempt from this requirement.

If a user without 2FA attempts to log in, access is blocked and instructions for setting up two-factor authentication are displayed.

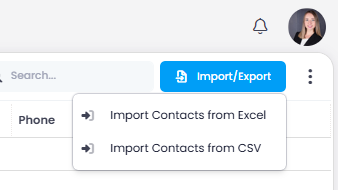
Excel and CSV Import for People and Contacts

You can now easily import contacts into InLoox using Excel or CSV files. After uploading your file, a matching assistant automatically analyzes the columns and suggests how they map to InLoox fields. The only required field is the email address — any additional information such as name, department, or phone number is optional and can be flexibly assigned.

This feature is especially useful when transferring contacts from external systems such as CRM tools or other data sources.

Import contacts from Excel and CSV

Filter Designer for custom fields: Easily control visibility

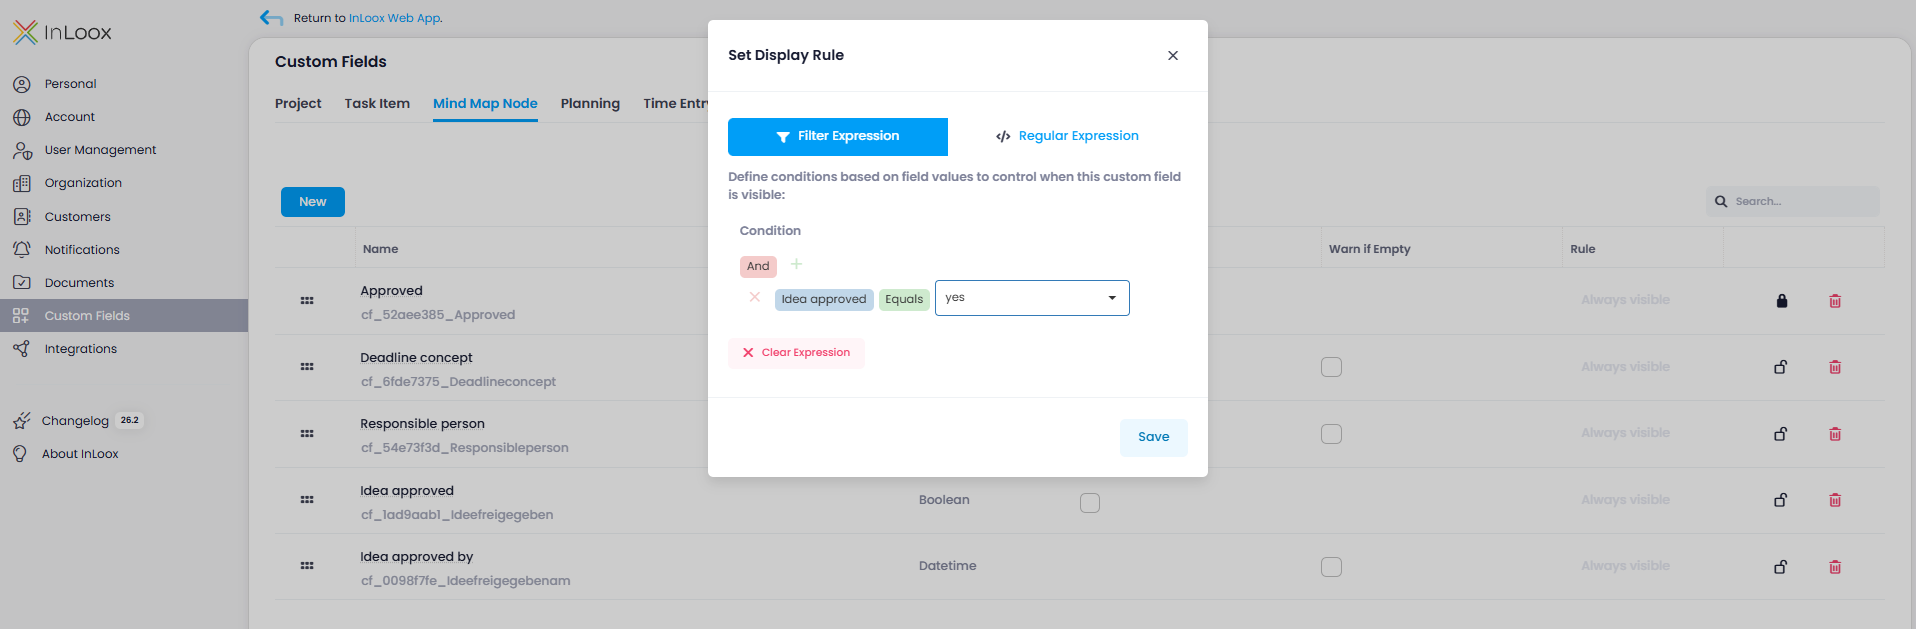
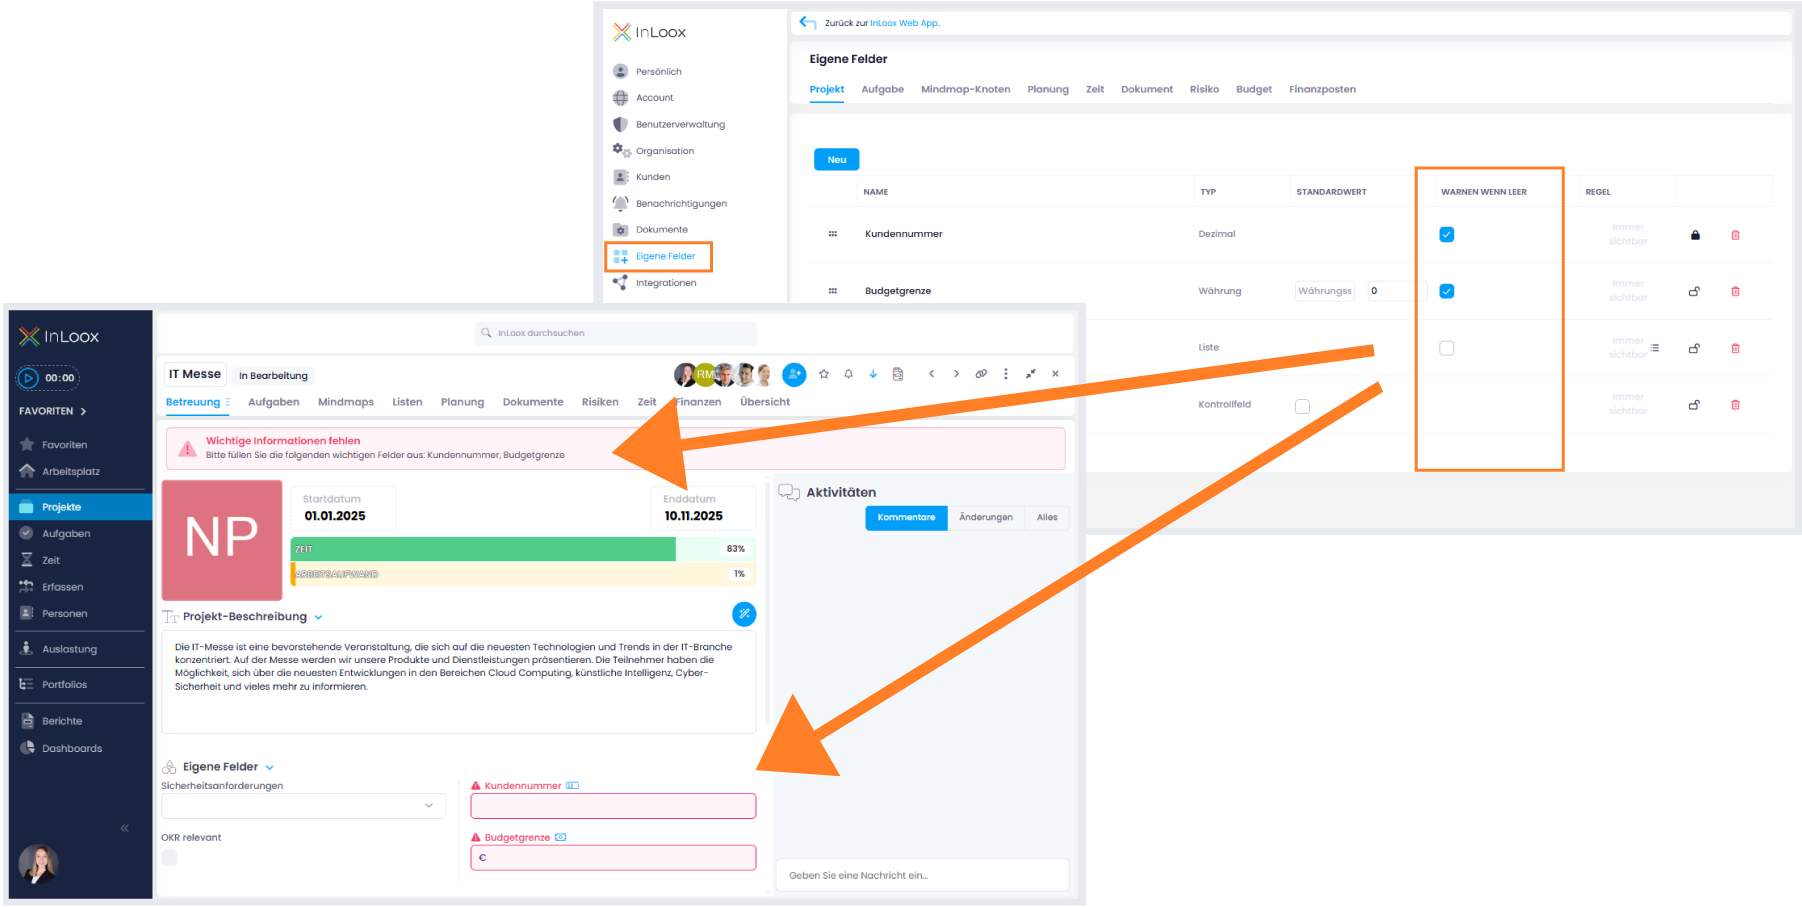
Custom fields can already be shown or hidden based on rules to support specific use cases. With the new Filter Designer, you now have significantly more options to define complex conditions and combinations.

A particularly useful enhancement: custom fields can now be shown or hidden depending on the values of other custom fields. This allows you to control field visibility more precisely and create cleaner, more context-aware input forms.

Example: You have two custom fields, "Idea approved" and "Approved by." The field "Approved by" can be displayed depending on the value of the other field, for example, only if "Idea approved" is set to "Yes."

Filter Designer for custom fields

Help article: Custom Fields

Please note: Custom fields are not available in the InLoox Professional Edition.

Multi-Factor Authentication via Authenticator App

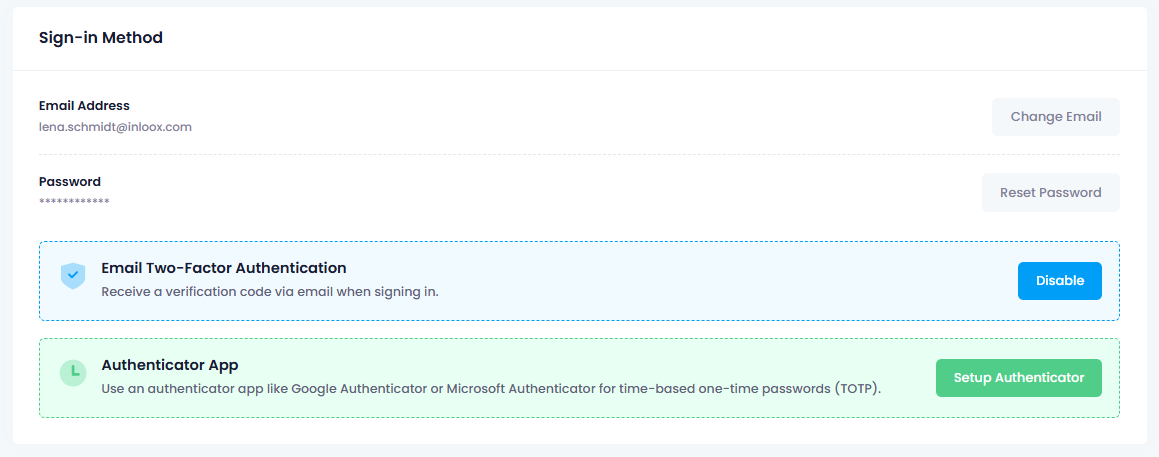
In addition to two-factor authentication via email, you can now use multi-factor authentication (MFA) with an authenticator app for login.

Setup is done via your user profile: After activating MFA, a QR code is displayed that can be scanned with any authenticator app. Once configured, a one-time code is required for each login, significantly increasing account security.

Set up two-factor authentication in profile settings

info

This feature is intended for users who do not sign in via Microsoft 365 SSO.

Extended Permissions: People, Tasks and Comments

With InLoox 26.1, permissions have been expanded and further refined. The following new rights have been introduced:

  • Edit people: Editing contacts is now a separate permission. Administrators receive this right by default, but it can be specifically revoked or assigned to other users as needed.
  • Add task comments: Controls who is allowed to create comments on tasks.
  • Delete task comments: Defines who is permitted to remove task comments.
  • Delete own task comments: Allows users to delete only the comments they have created themselves.
  • Delete tasks: Determines who is generally allowed to delete tasks.
  • Delete own tasks: Allows users to delete tasks for which they are assigned as the responsible resource.

These additions enable even more precise control over access rights and responsibilities.

Notification Center

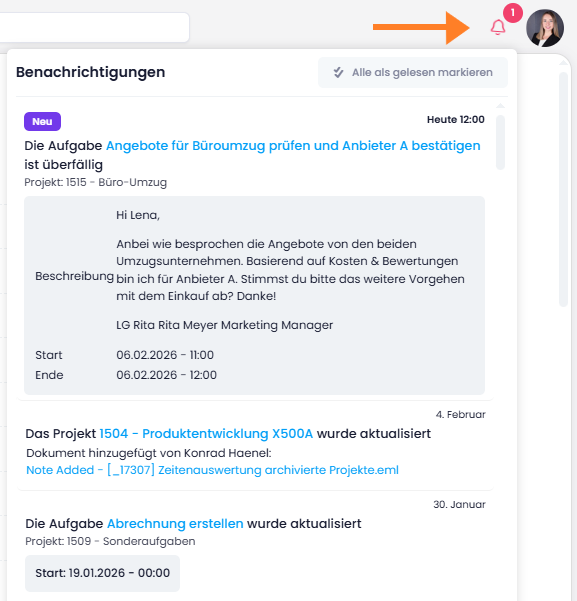
With version 26.1, we're introducing a centralized Notification Center, now located in the top-right corner. This is where all important updates related to your projects and tasks come together — clearly organized, up to date, and always within reach.

You'll see project news, task changes, and notifications when you're mentioned in comments — all in one place.

Notification Center

Help article: Notifications

User Groups for Projects

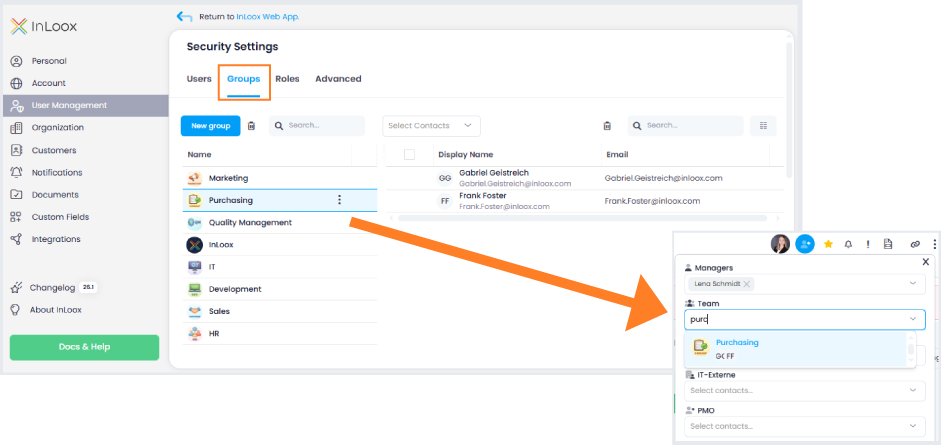
Managing project participants is now easier: In the Account Settings, you can create user groups within user management and assign individual users to them. The key benefit: project roles can now be assigned at group level.

In practice, many projects regularly involve the same teams — such as Marketing, HR, Development, or Procurement. Instead of adding each team member individually to every new project, simply assign the appropriate group to the desired project role. This significantly reduces the manual effort required when setting up new large-scale projects.

Add user group to project

This feature is available in the InLoox Enterprise, Enterprise Plus, and Self-Hosted editions only.

Custom Fields for People

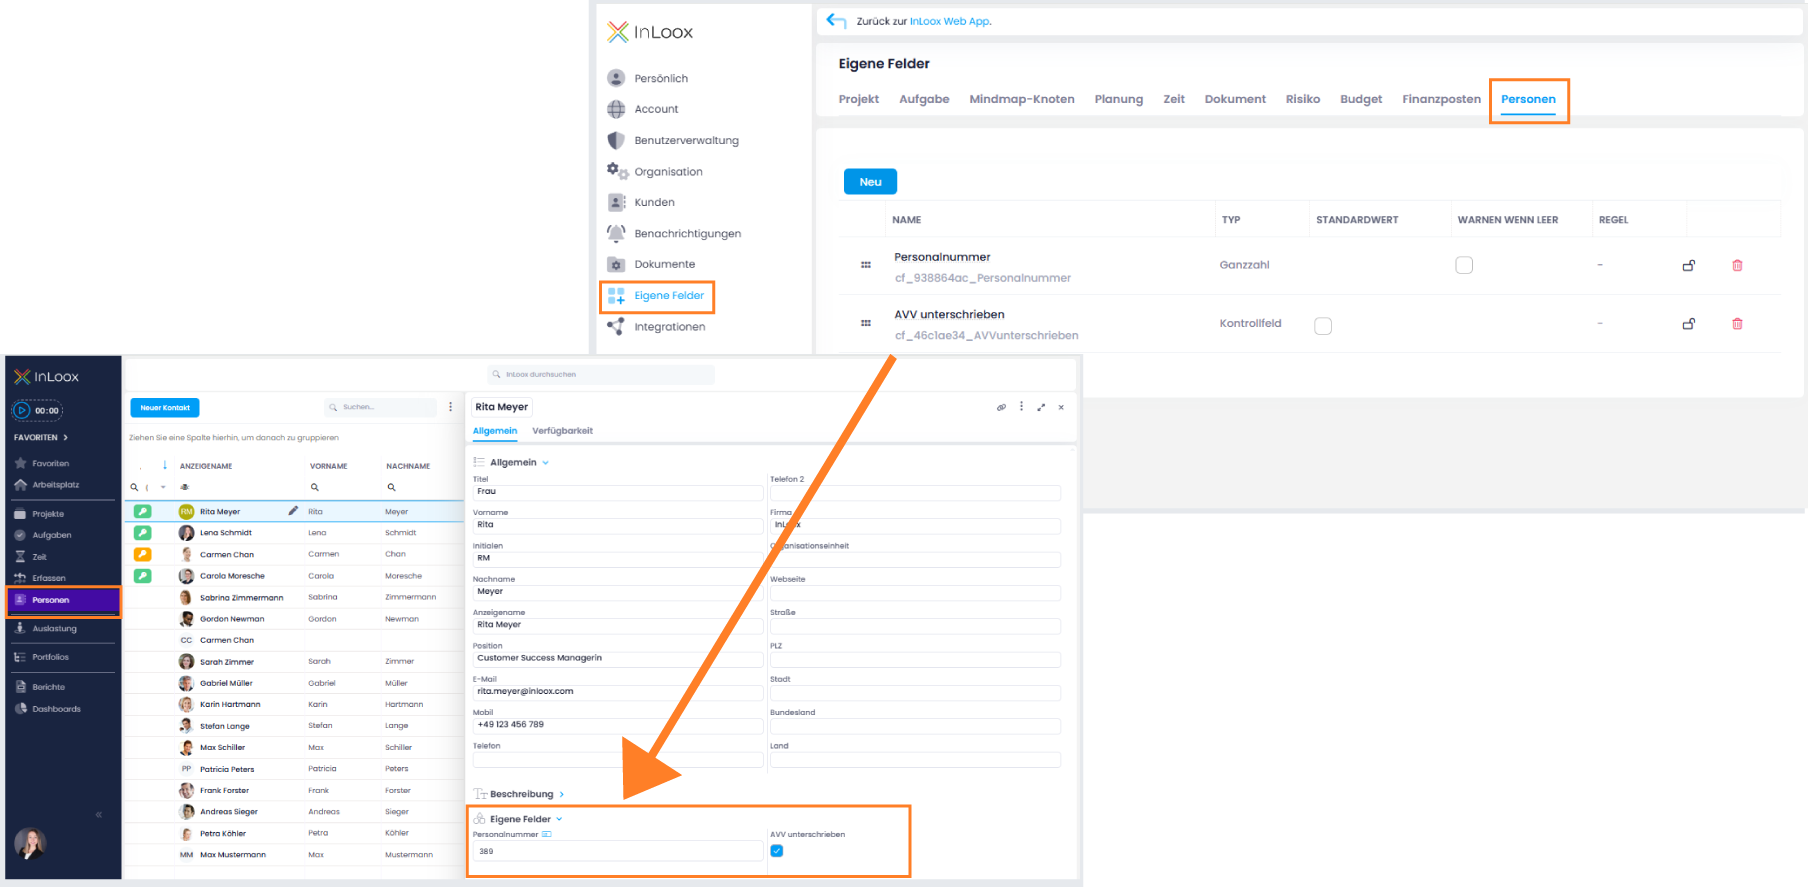
Custom fields are now also available for people/contacts, allowing you to capture and maintain additional information in a structured way.

Typical use cases include storing extra details about external partners like additional customer addresses, recording employee numbers, or adding simple checkboxes such as "DPA available." Custom fields are also ideal for data imported via interfaces from other systems, such as ERP or CRM solutions.

Custom fields for people

Enhanced Task Permissions

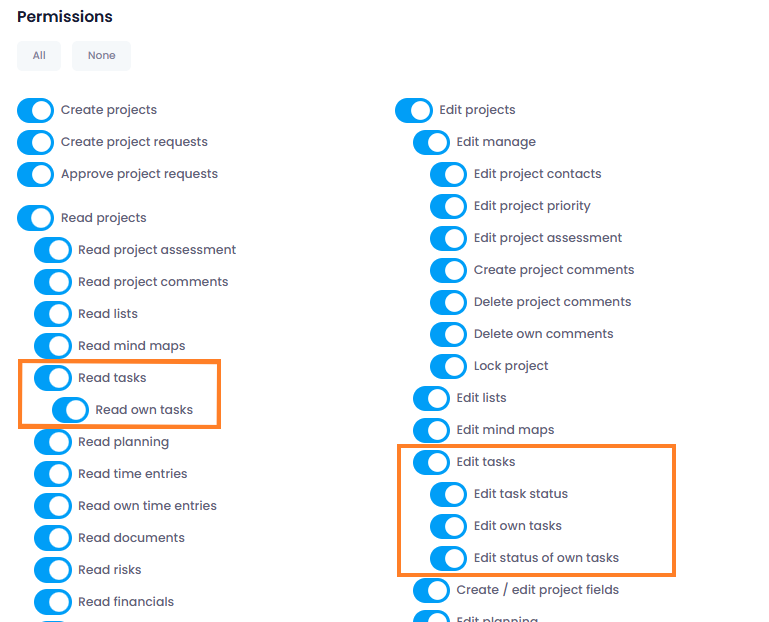
Task permissions have been expanded to more precisely reflect roles and responsibilities within a project. In addition to the previous permissions "Read Tasks" and "Edit Tasks," several new, more granular permissions are now available. These allow you to individually control reading, editing, and status-change rights.

Enhanced task permissions

Overview of new and existing task permissions:

  • Read tasks
  • NEW Read own tasks
  • Edit tasks
  • NEW Change task status
  • NEW Edit own tasks
  • NEW Change status of own tasks

Help article: Permissions

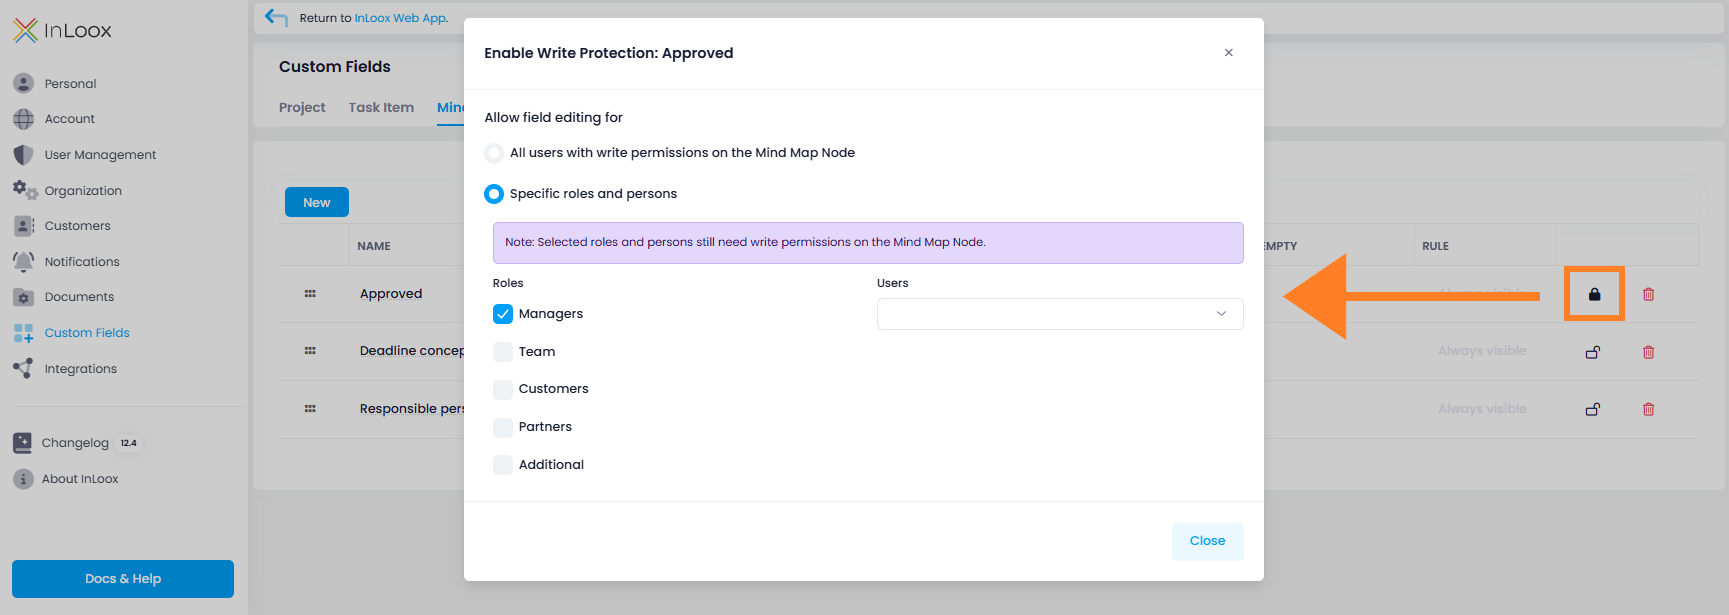
Custom Fields: Write Protection

You can now define who is allowed to fill out custom fields. This allows you to control and secure inputs much more precisely. In the settings, you can configure:

  • Role-based: e.g., only the project manager may edit a specific field
  • User-specific: specific individuals may edit certain fields
  • Combination of both: maximum flexibility for complex scenarios

Define write protection for custom fields

Help article: Custom Fields

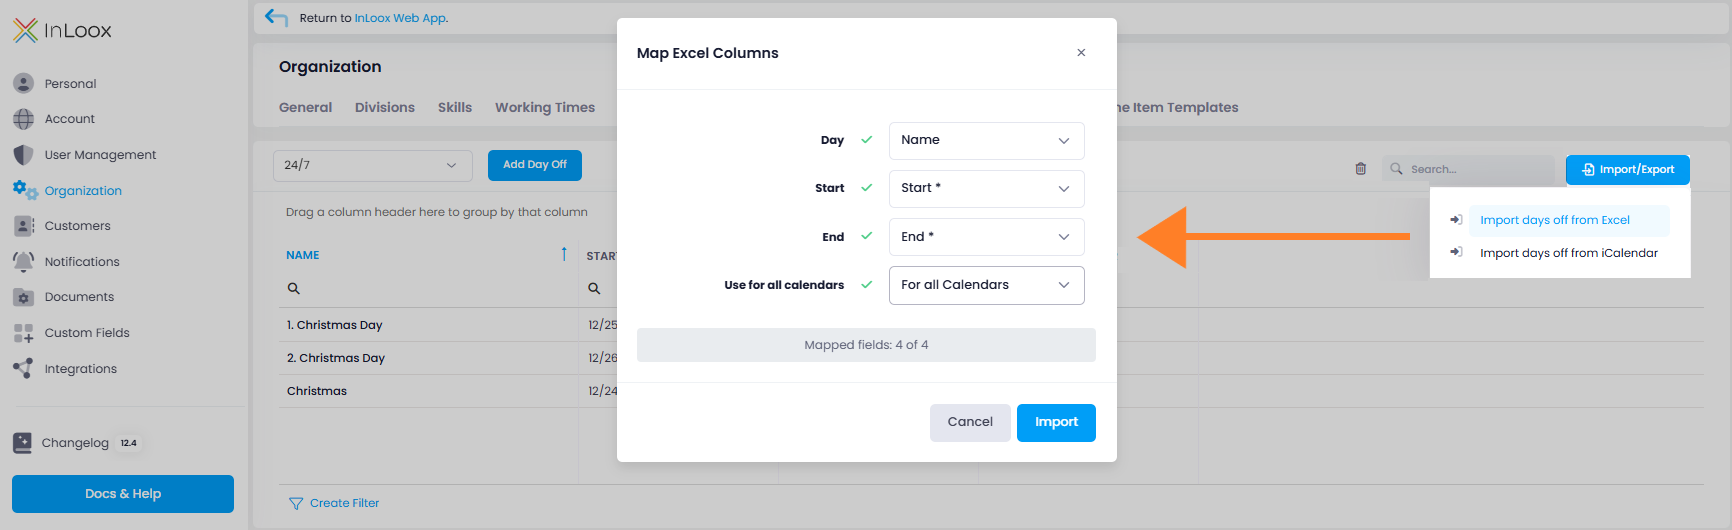
Import Days Off via Excel and iCalendar

Do you want to reflect non-working days such as public holidays or company vacation in the calendar? You no longer need to enter them manually in the settings. Instead, you can conveniently import them via Excel file or iCalendar.

The file must include information on the Name of the non-working day, Start and End. Optionally, you can also add a column "For all calendars" if days off should apply to all calendars. This allows you to quickly import extensive calendar data and centrally provide it for the entire organization.

Upload days off via Excel file and use them for the work time calendar

Customization of the User Interface

You now have full control over the layout of your InLoox workspace. Customize the user interface to perfectly match your personal working style:

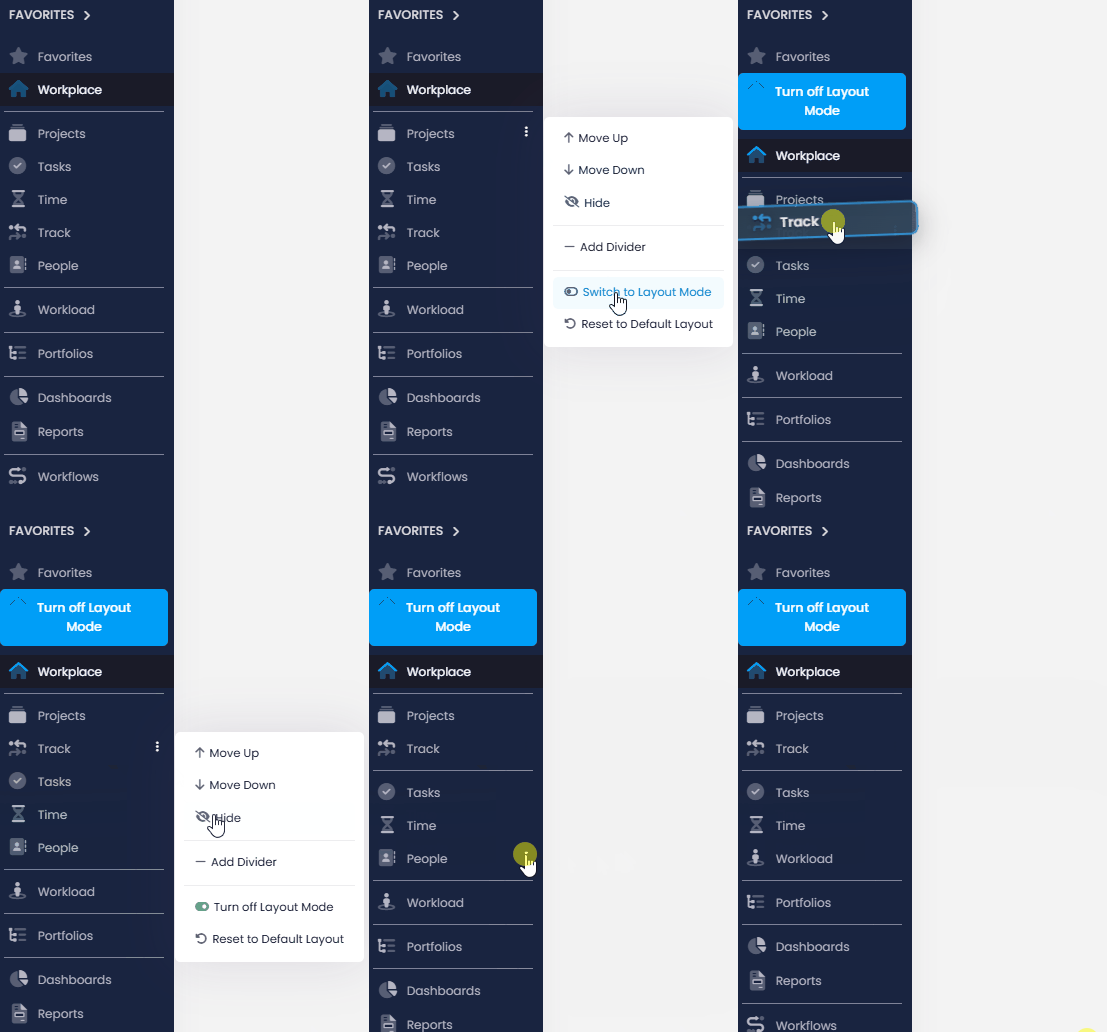
Customizable Main Navigation

Using the three-dot menu, you can adjust the order of the individual menu items.

  • You work a lot with the Track feature? Simply drag it further up.
  • Don't need the People section? Just hide it.
  • And for even better clarity, you can insert dividers to group content thematically.

Customizable Main Menu in InLoox

Customizable Project Tabs

Within a project, you can also decide which tabs are shown and in which order. Whether it's the Manage page, Tasks, Lists, Planning, Mind Maps, Documents, Time, or Financials – simply drag and drop the tabs to the position that suits you best.

Customizable Project Tabs in InLoox

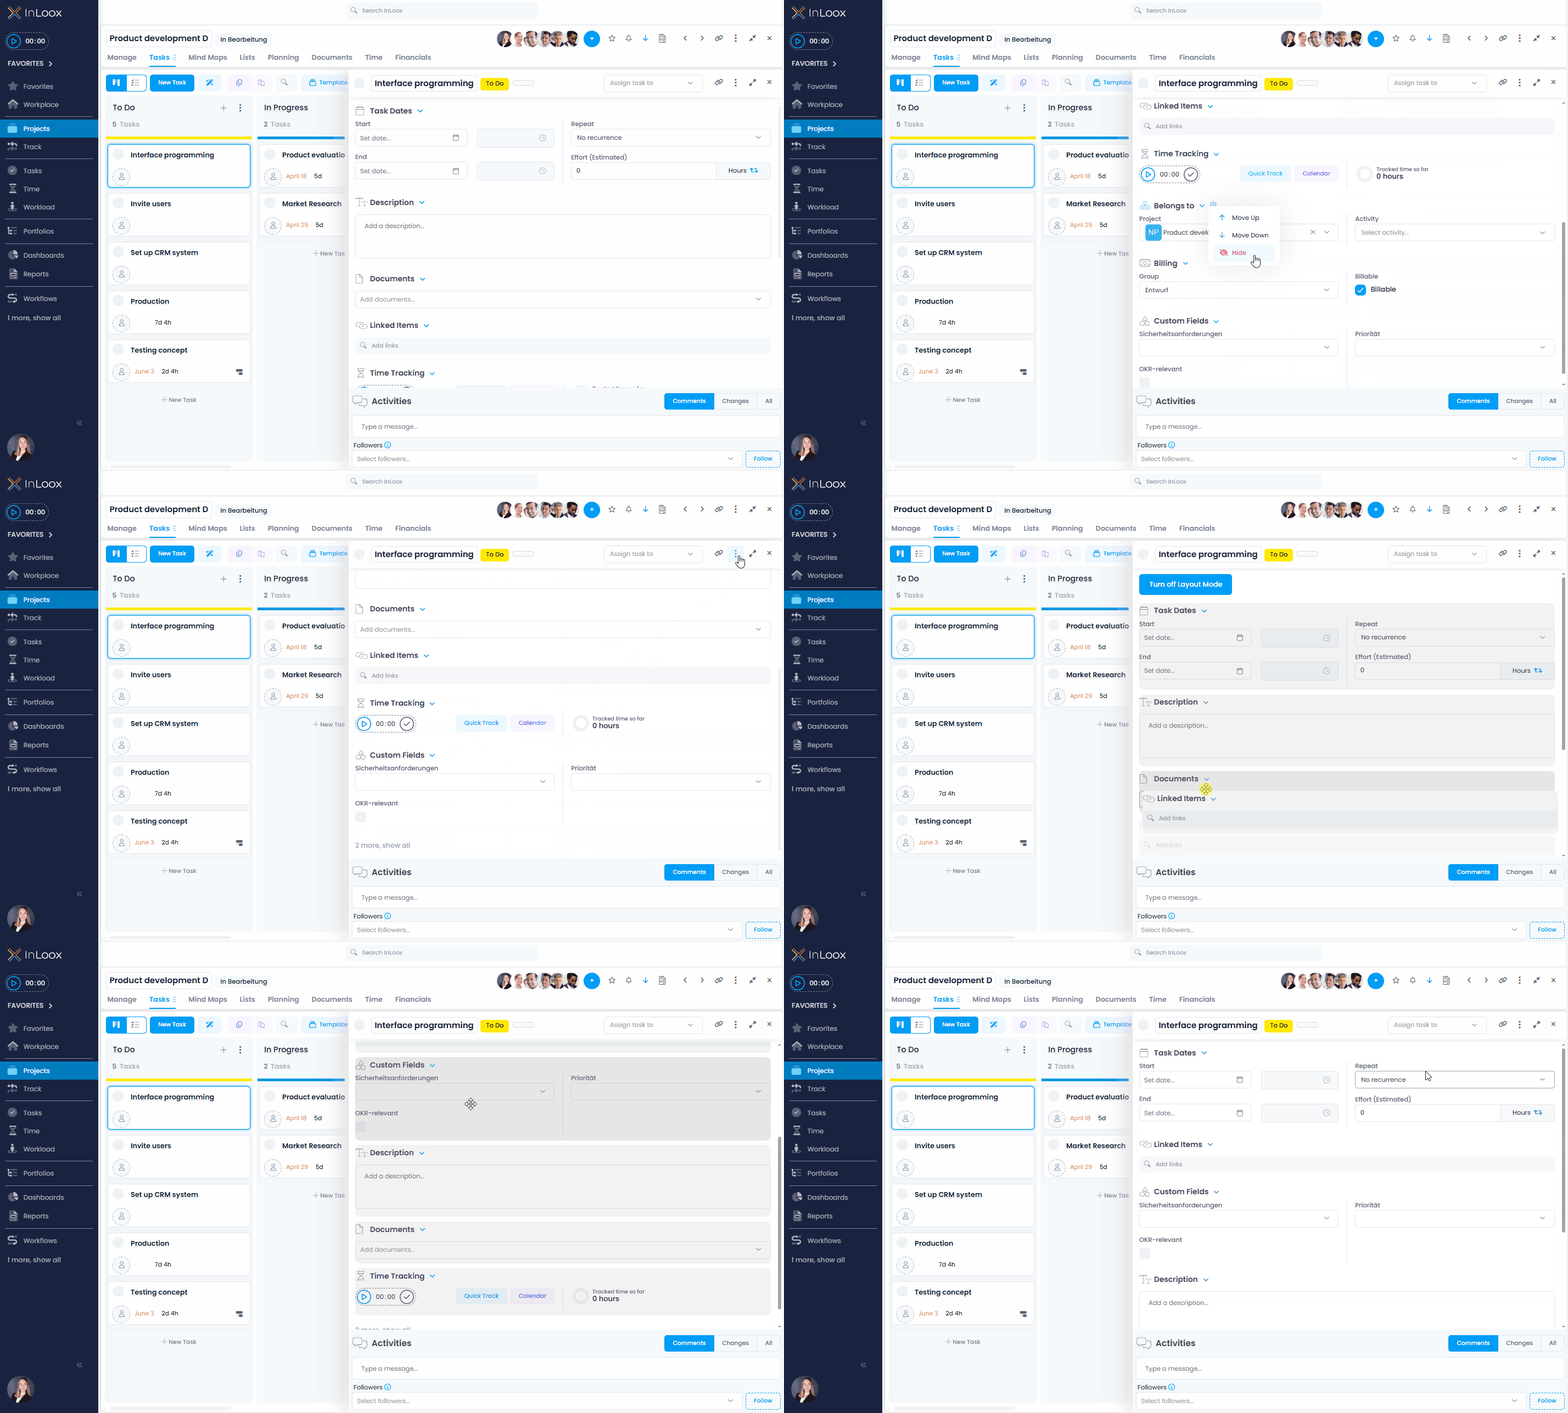
Individual Detail Side Panels

Even on the level of individual tasks, time entries, and more, you can tailor the view to your needs: Move frequently used fields to the top, or hide fields you don't require.

You can make these changes either via the gear icon next to each section or enter layout mode through the three-dot menu to configure everything in detail.

Customizable Side Panel in InLoox

info

All settings apply only to your personal view. And if you'd like to return to the default layout at any time, you can reset everything with a single click.

Help article: Customize InLoox UI

Minute-Precise Configuration of the Working Time Calendar

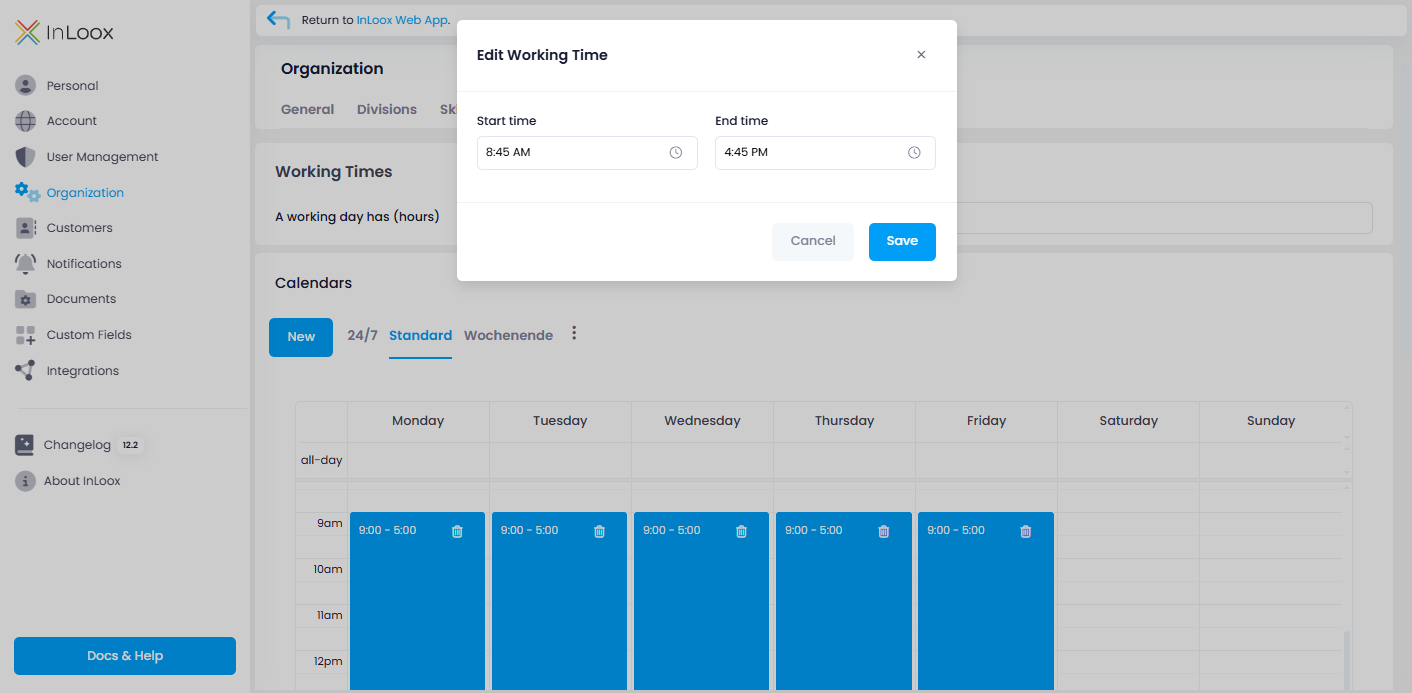
Would you like to define your working hours even more precisely? From now on, you can configure the working time calendar down to the exact minute – previously, this was only possible in 30-minute increments. Simply click the relevant time bar. In the Edit Working Time window, you can manually enter the start and end times to the minute.

note

This setting can only be configured by administrators in the InLoox settings.

Set working time calendar down to the minute

Skill Search in Resource Assignment

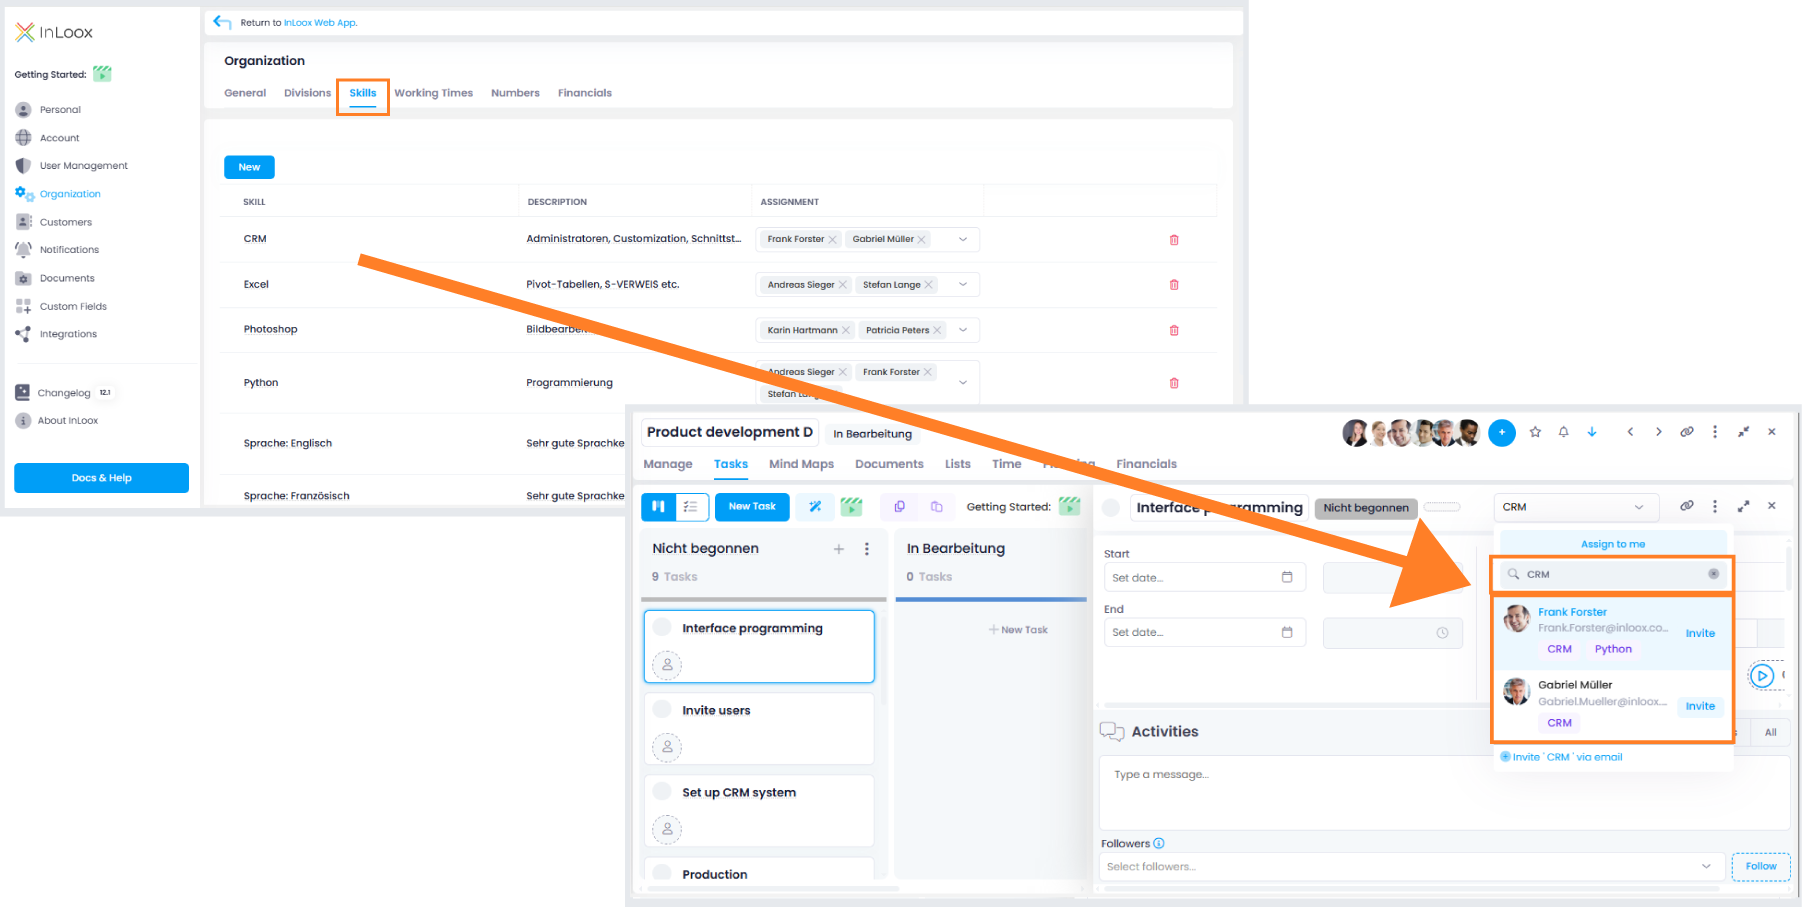
Assigning resources in projects is now even more efficient: InLoox now lets you search for specific skills directly in the resource selection field. Based on the skills previously defined in the organizational settings, such as "CRM experience," "Excel," or "Photoshop", the system automatically suggests people who match those qualifications. This makes it easy for project managers to find the right person for the task in no time. It saves time and ensures that expertise is used where it adds the most value.

Using skills in resource assignment

Custom Project Roles

Previously, InLoox offered five predefined project roles: Project Manager, Team Member, Client, Partner, and Other – each with customizable permissions.

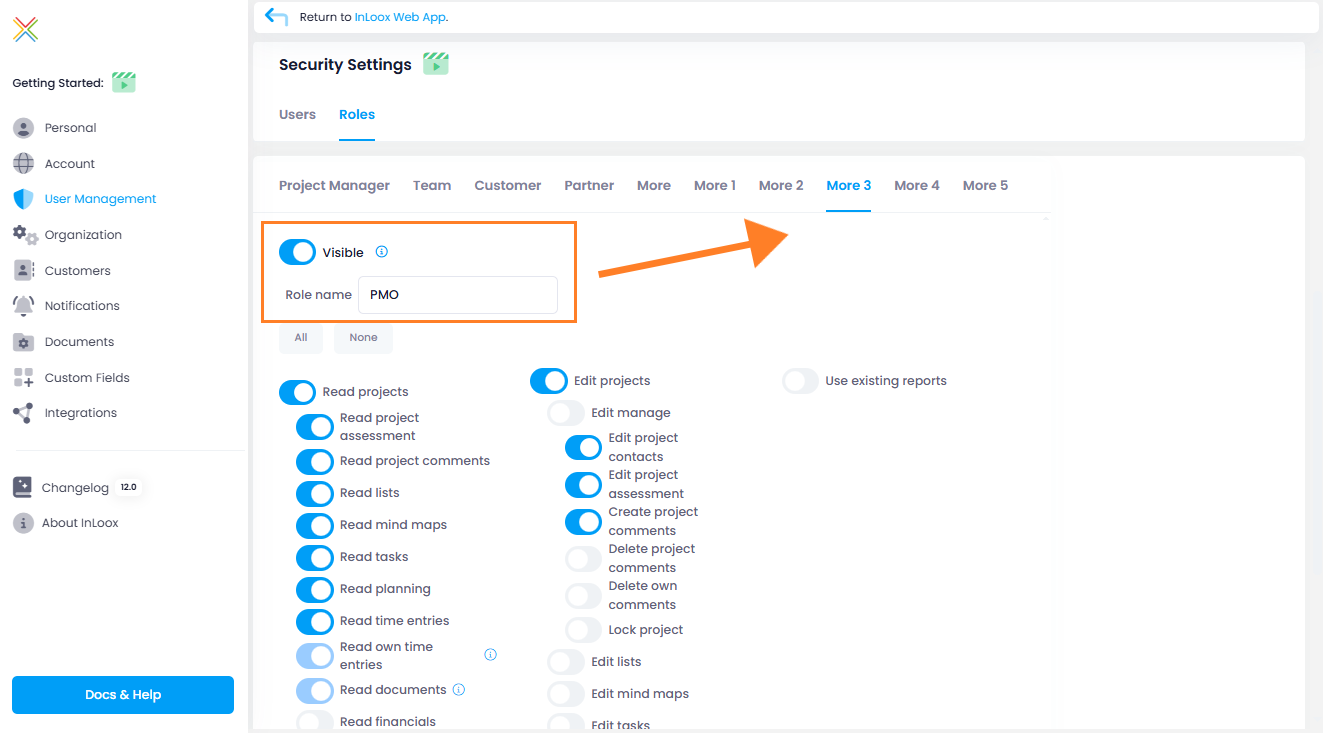
Now, role management becomes even more flexible: You can add up to five custom, dynamic project roles and adapt your project structure precisely to your organization's hierarchy, team setup, or industry-specific requirements.

These roles can be freely named and equipped with individual permissions, giving you a clear and precise access control model. This is especially useful for large organizations, project-driven departments, or highly regulated industries.

Custom project roles

info

Custom roles are only available in InLoox Enterprise Plus & InLoox On-Premise Editions.

Help articles: Permissions | Project members