Edit Task
You have created a task. Now you can fill the task with life and add various information.
To edit the task, you can either use the quick selection directly in the Kanban card or open the task for more details by clicking the pen icon.
Quick Selection: Add a Few Details
Without having to open the task, you can change the name of the task and use the lower round buttons to change the resource, set the end date, and estimate the effort. To do this, use the fields that appear when you move the cursor over the task.

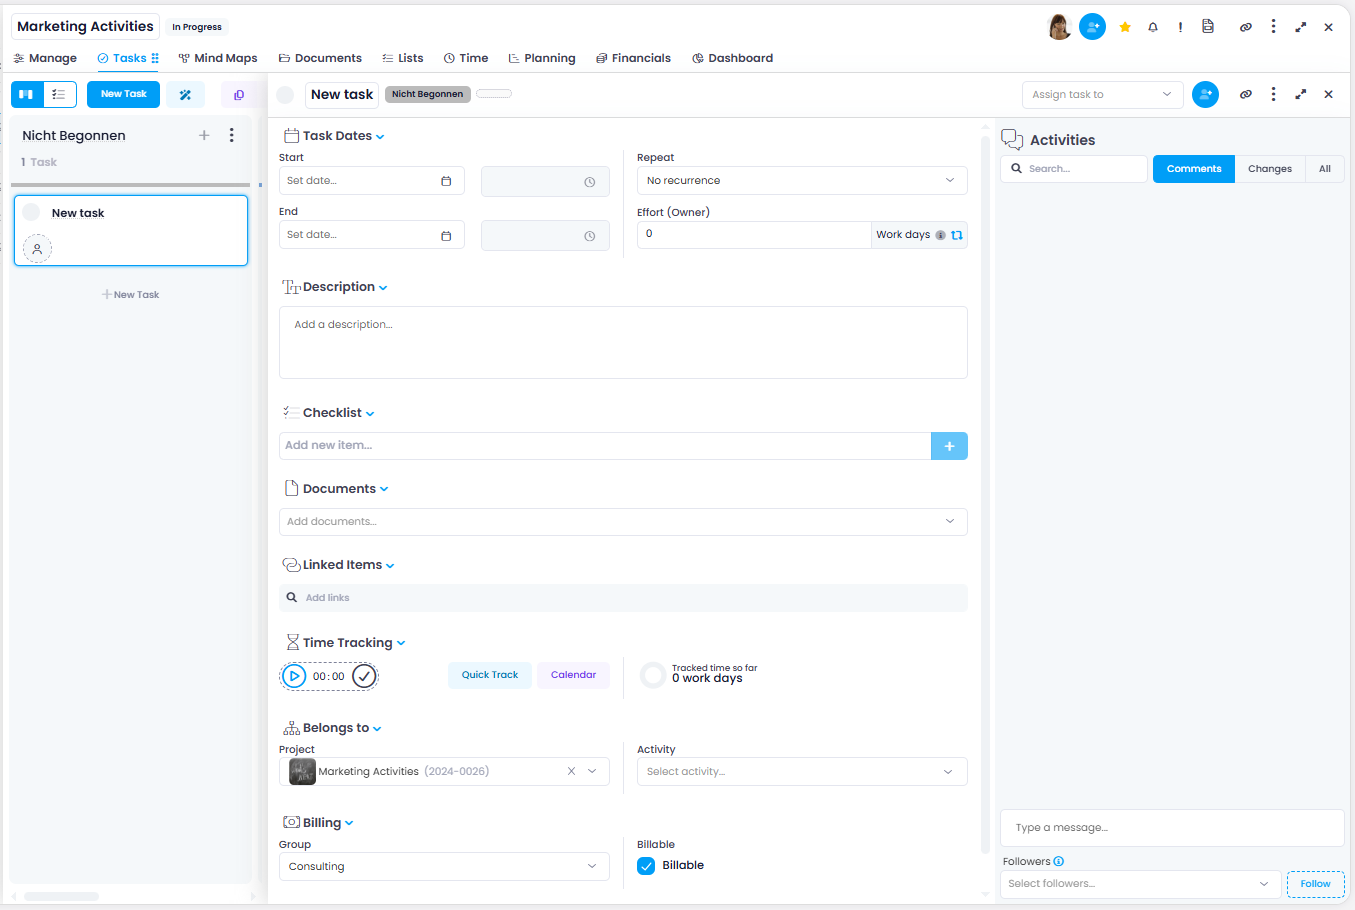
Open Task and Edit It
Open a task in the Kanban board by clicking on the pen icon. Alternatively, open a task in the list view of the project tasks by clicking on the pen icon.
In the side panel, you can edit all the details of the task. Here you can enter further details:
- Name of the task
- Status: The status is automatically displayed depending on which column of the Kanban board the task is currently in (e.g. "In Progress").
- Color coding: To the right of the status, you have the option to assign a color to the task. This allows you to organize your tasks according to a color scheme if desired, and for example give related tasks the same color.
- Resource: At the top right of the task, you can assign the project task to a resource. Tasks that you create in the Workplace are automatically assigned to you. In classic Kanban, team members "pull" tasks themselves from the To Do column. For a quick selection of frequently used resources, click in the field so that a dropdown opens. Now select the person who should be responsible for the task. If you assign a task to a person, that person will be notified. Only one resource can be assigned per task.
- Collaborators: Next to the resources, you can add further people as collaborators to the project task. This helps you keep track of who contributes how much effort to the task. Type in the name of the people you want to add as collaborators and assign them the effort (work days).
- Start and end date incl. time: You can specify a time frame for your task, but you do not have to. If you want to specify a start and/or end date, click in the corresponding fields and select a date. You can either specify only a start date, only an end date (equivalent to the due date), or both start and end dates. You can customize your task list so that you always see the due date of your tasks. To the right of the start and end date fields, you find fields that allow you to specify the dates by entering fixed hours.
- Effort: Here you enter the amount of time you plan for completing the task. This information serves as the basis for calculating the resource workload, for time tracking entries, and budget items. You can change this amount at any time here.
- Task description: Add a text here as an additional description of the task. The description field uses an HTML editor with the following capabilities:
- Undo/Redo
- Font family, font size, and headings
- Text formatting (bold, italic, lists, etc.)
- Text color and background color
- Text alignment (left, center, right)
- Insert links
- Insert images
- Tables with columns and rows
- URLs in plain text are automatically displayed as clickable links
- Add documents: If certain documents belong to the task, you can link them to the task.
- Group: Here you can select a budget group. For each budget group, an internal price per hour is defined in InLoox. This will be applied to the task by assigning the group. Budget groups can be set by the InLoox administrator in the Account Settings.
- Project: Here you have various possibilities:
- If you have created the task within a specific project, this project is already entered.
- You can assign a project by selecting the desired project from the dropdown. You can also use the search function — simply type in the first letters of the project you are looking for and select the corresponding project. You can also search for clients, then projects associated with that client will be displayed.
- You can change the project assignment by selecting another project from the dropdown menu. Or you can click on the X, type in the project name, and select the new project.
- You can also create a new project from within the task. To do this, simply enter the new project name in the Project field — if this name is not found in the existing database, the option "Create new project" appears. Confirm with Enter to create the new project.
- If you want to remove the task from the project, click on the X.
If you remove the project assignment, you will only find the task in the global task list. If the task is assigned to a planning activity in the Gantt chart, you cannot move this task to another project. You must first remove the task from the planning activity by clicking the X in the Activity field.
- Activity: If you have created a Gantt planning, you can assign the task to an activity here. If you want to remove the task from the planning activity, simply click on the X in the Activity field.
- Billable: This checkbox is activated by default when a task is created.
- Linked Items: Here you can connect the task to relevant items from the current or other projects in InLoox — such as tasks, documents, time entries, mind maps, budgets, or planning elements. The links are bidirectional, allowing you to jump directly to the connected content at any time.
- Time Tracking: Create time entries for the task directly from here. This section also shows all time entries that are already linked to the task.
- Custom Fields: Custom fields can be managed in the Account Settings.
- Activities: Activities include comments from project members about the task as well as changes to the task. This makes it possible to track when, for example, the start or end date has been changed or when a task has been moved to a different status. Project members can communicate updates via comments and mention other project members as well.
- Follower: Here other project members can be entered if they want to be notified automatically by email about changes, even if they are not entered as a resource themselves. If project members are mentioned in the comments, they are automatically entered as followers.
- Copy link: In the upper right corner via the link icon, you have the option to copy a link of the task and send it to your team members.
- Copy/paste: You can use the purple copy/paste icons from the menu to select existing tasks and either duplicate them in the current project or copy them to another project.
When you have entered all the details, you can close the task. All details will be saved automatically.