Time Tracking
Time tracking of tasks
You have several options for tracking time on tasks:
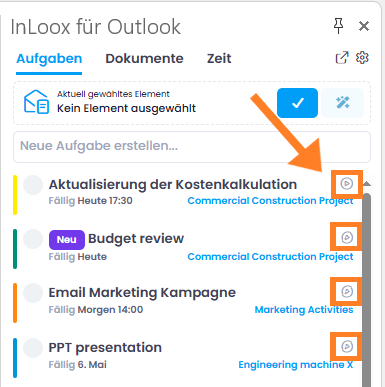
Use the stopwatch in the task overview
-
You don't need to open a task to start the stopwatch. In the side panel, there is a play button next to each task that is assigned to a project. Use it to start and pause time tracking at any time.
-
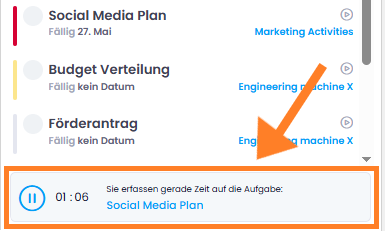
At the bottom of the side panel, the currently running stopwatch is always displayed. This way, you can keep track of your active time tracking even when switching between tabs.
- To book the recorded time to a project, open the task and confirm the time entry by clicking the checkmark next to the stopwatch.
Use the stopwatch within a task
- Open the task and start time tracking by clicking the play button on the stopwatch.
- The stopwatch can be paused and restarted at any time.
- Confirm the time entry by clicking the checkmark next to the stopwatch.
Quick Track
- Open the relevant task by clicking on it.
- Under time tracking click the Quick Track button.
- Select one of the predefined durations: 5 min, 15 min, 30 min, 45 min, 1 h, 2 h, 4 h or Other duration to enter a custom value.
![]()
Time tracking of Outlook elements
In the InLoox for Outlook add-in, switch to the Time tab to track time from emails and calendar appointments.
Track time from emails
- Switch to the Time tab in the InLoox for Outlook add-in.

- In the side panel, select the project you want to track the email time against.
- In Outlook, select the email you want to track time for.
- Under A: Track time from email, click the blue checkmark button next to the selected email to create the time entry.
By default, the email subject is used for the time entry. Via the three-dot menu, you can enable the slider to include the email body. You can also choose whether a category should be applied to tracked emails.
- The time entry opens, and you can enter details such as duration.
- Done — the time has been tracked.
Track time from calendar appointments
This feature works with both Microsoft Exchange Online and Microsoft Exchange Server (Self-Hosted), but the workflow differs slightly:
With Microsoft Exchange Online
- Switch to the Time tab in the InLoox for Outlook add-in.
- In the side panel, select the project you want to track time against.
- Under B: Track time from appointment, you can view your Outlook calendar appointments, scroll through your calendar, open appointment details, or join online meetings directly.
- Click the Track button next to an appointment to create a time entry. You can adjust the details such as the duration if needed.
- Done — the time has been booked and the calendar entry is marked as Tracked.

Click the three-dot menu next to the project selection to configure general settings for calendar time tracking:
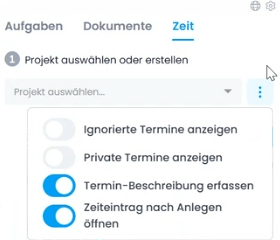
- Ignore: Private appointments or appointments that should not be billed can be ignored. Simply click the Ignore button next to the relevant appointment.
- Show ignored appointments: Displays previously ignored appointments again.
- Show private appointments: Also shows appointments marked as private.
- Include appointment body: Defines whether the full appointment description is included in the time entry.
- Open time entry when tracked: Automatically opens the time entry after tracking for further editing.
With Microsoft Exchange Server (Self-Hosted)
- Open the calendar appointment directly in Microsoft Outlook.
- With the appointment open, click Open InLoox Add-in in the Outlook ribbon to open the InLoox for Outlook add-in.
- Switch to the Time tab in the add-in.
- In the side panel, select the project you want to track time against.
- Under B: Track time from appointment, the currently open appointment is displayed. Click the Track button to create a time entry.
- Done — the time has been booked and the calendar entry is marked as Tracked.