Tasks
In the Tasks tab of the side panel, you can see an overview of all your current and upcoming tasks. Tasks are sorted by due date so you can easily identify which ones have priority.
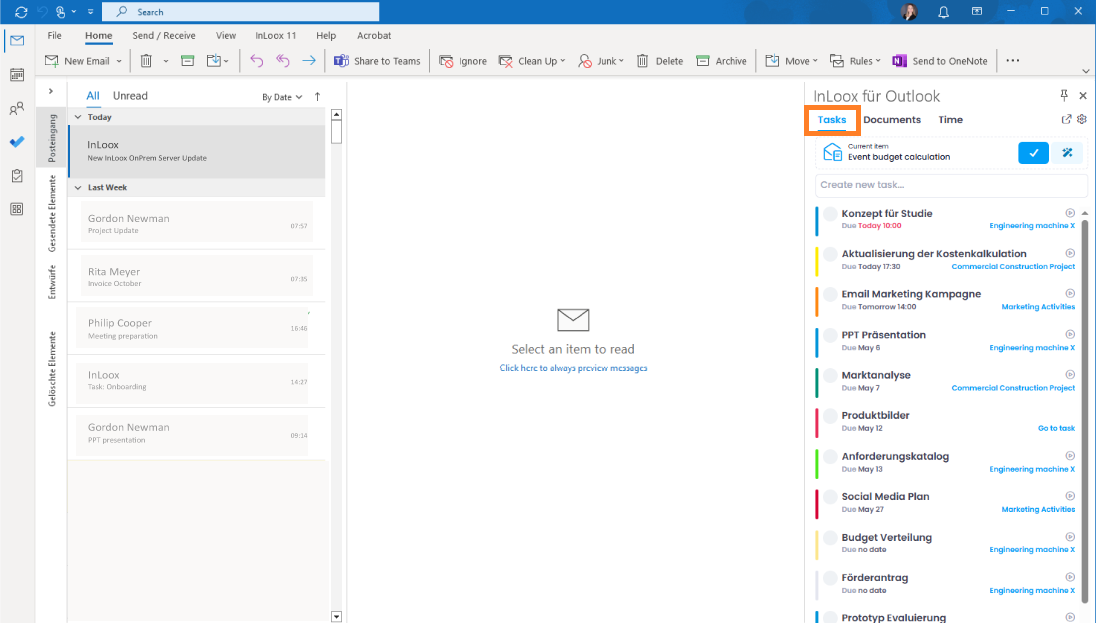
Newly created tasks are marked with a purple New label in the side panel so you can find them quickly. Completed tasks from the current day are shown crossed out at the end of the list.
Assign different colors to your tasks to keep a better overview in the side panel — for example, by project, priority, or topic.
Create new tasks
You have several options for creating tasks:
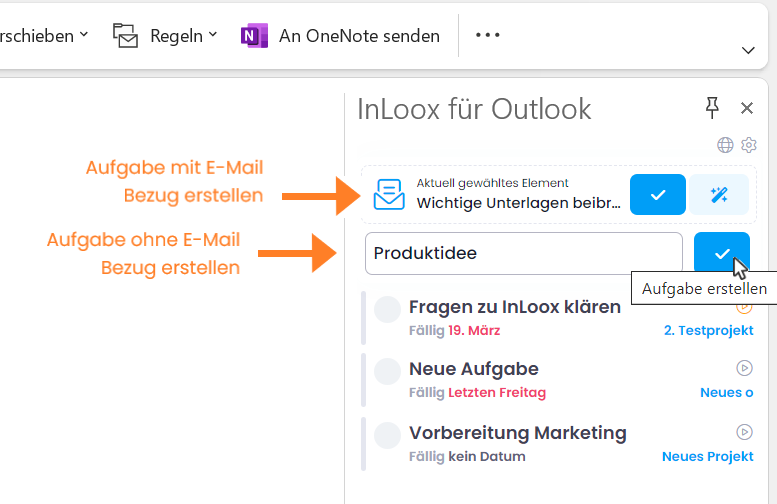
Create a new task without an email reference
- In the side panel, there is an empty field directly above the task list. To create a new task without referencing an email, simply type the task name into this field.
- Click the blue checkmark button to the right to create the task.
- The new task appears in the task list, where you can open and edit it.
Create a new task from a selected email
- Select the email you want to use as the basis for the new task. The selected email is displayed in the side panel under Current item.
- Click the blue checkmark button next to Current item to create the task.
- A task is created using the email subject as the task name. The email body is automatically copied to the task description. The email is also tagged with the InLoox category.
Let the InLoox AI Assistant suggest tasks
- For emails that may contain multiple action items, you can use the InLoox AI Assistant. Select the relevant email.
- Click the AI Assistant button. The assistant analyzes the email and suggests possible tasks, including an estimated effort and a recommended due date.
- To accept a suggestion, click the OK button next to it.
- The task then appears in your task list, ready to be edited.

Create a task by flagging an email
This feature was introduced in InLoox version 26.1 (February 2026).
You can also create tasks without opening the side panel — simply by flagging an email in Microsoft Outlook.
Prerequisites:
- Your InLoox account is linked to your Microsoft 365 account.
- The permission Create tasks from flagged emails is enabled in the Integration Center.
- Optional: The permission Update flags in emails is enabled to keep flags synchronized between InLoox and Microsoft Outlook.
When you flag an email by clicking the flag icon, a personal task is automatically created in InLoox. The task appears in your Workplace and in the Tasks tab of the side panel, where you can further edit it and assign it to a project.
By right-clicking the flag icon, you can set a due date (e.g. tomorrow). This due date is taken into account when the InLoox task is created.
If you have enabled Update flags in emails, the email in Microsoft Outlook is automatically marked as completed as soon as you set the task status to done in InLoox.

Edit tasks
Here is how to edit tasks efficiently:
1. Open a task: Click the task in the task list to open the detail view.
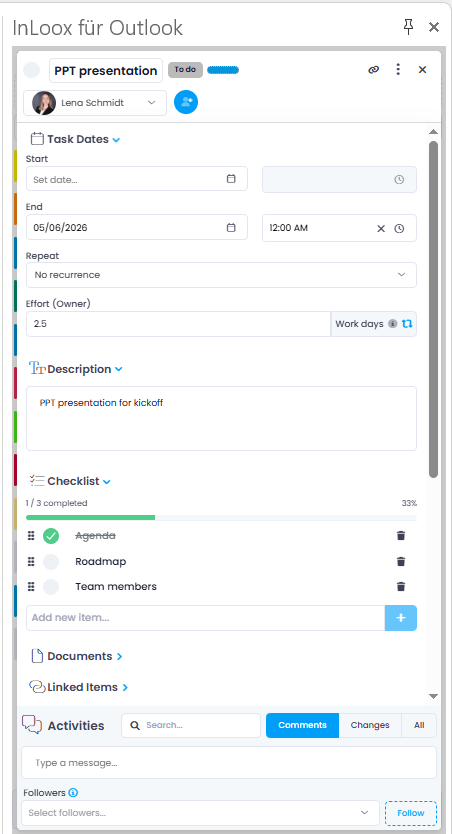
2. Edit the task: In the detail view, you can edit the task as usual. All features available in InLoox Web App are also available here:
- Start and end date: Define the time frame by adjusting the start and end dates.
- Repeat: Set up a recurrence to automatically recreate regularly occurring tasks.
- Estimated effort: Enter the estimated effort required to complete the task.
- Description: Add a detailed description to communicate context and requirements clearly.
- Checklist: Add individual steps as checklist items to track progress within the task.
- Documents: Drag and drop documents and email attachments into the task.
- Linked items: Link the task to other tasks, documents, or projects.
- Time tracking: Track working time using the stopwatch, quick track, or calendar.
- Belongs to: Select the associated project and, if applicable, the associated activity.
- Billing: Select a billing group and use the checkbox to mark the task as billable.
- Custom fields: Fill in custom fields, if previously defined in the Account Settings.
- Comments: Leave comments to share additional information or communicate with your team.
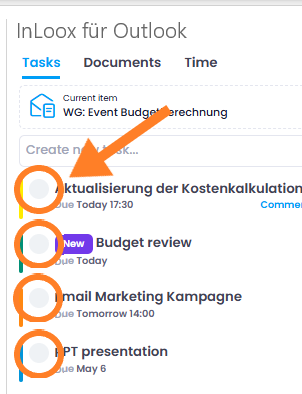
Complete tasks
Checking off completed tasks keeps your work organized. You have two options:
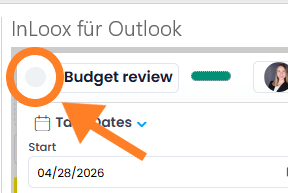
1. Mark as completed in the detail view:
- Open the task and click the white circle next to the task name.
2. Mark as completed in the task list:
- Click the white circle to the left of the task name directly in the list — no need to open the task first.
- After clicking, a green checkmark appears and the task is marked as completed.
Completed tasks are shown crossed out at the end of the task list, giving you a clear overview of what you have accomplished during the day.