Track Emails (up to InLoox 12)
This article covers the Track features available only for InLoox Self-Hosted Edition 12.5.1 or earlier. For newer versions, see the Track Emails (since InLoox 26) article.
The Track function in InLoox allows you to turn Outlook emails into tasks or documents, and to track calendar entries as time entries — all directly from within InLoox.
Turn Emails into Tasks with AI
You can turn your Outlook emails into project tasks with a single click using AI.
This feature requires enabling the InLoox AI Agent under InLoox Account Settings >> Organization >> Privacy Settings. Not available in InLoox Self-Hosted Edition.
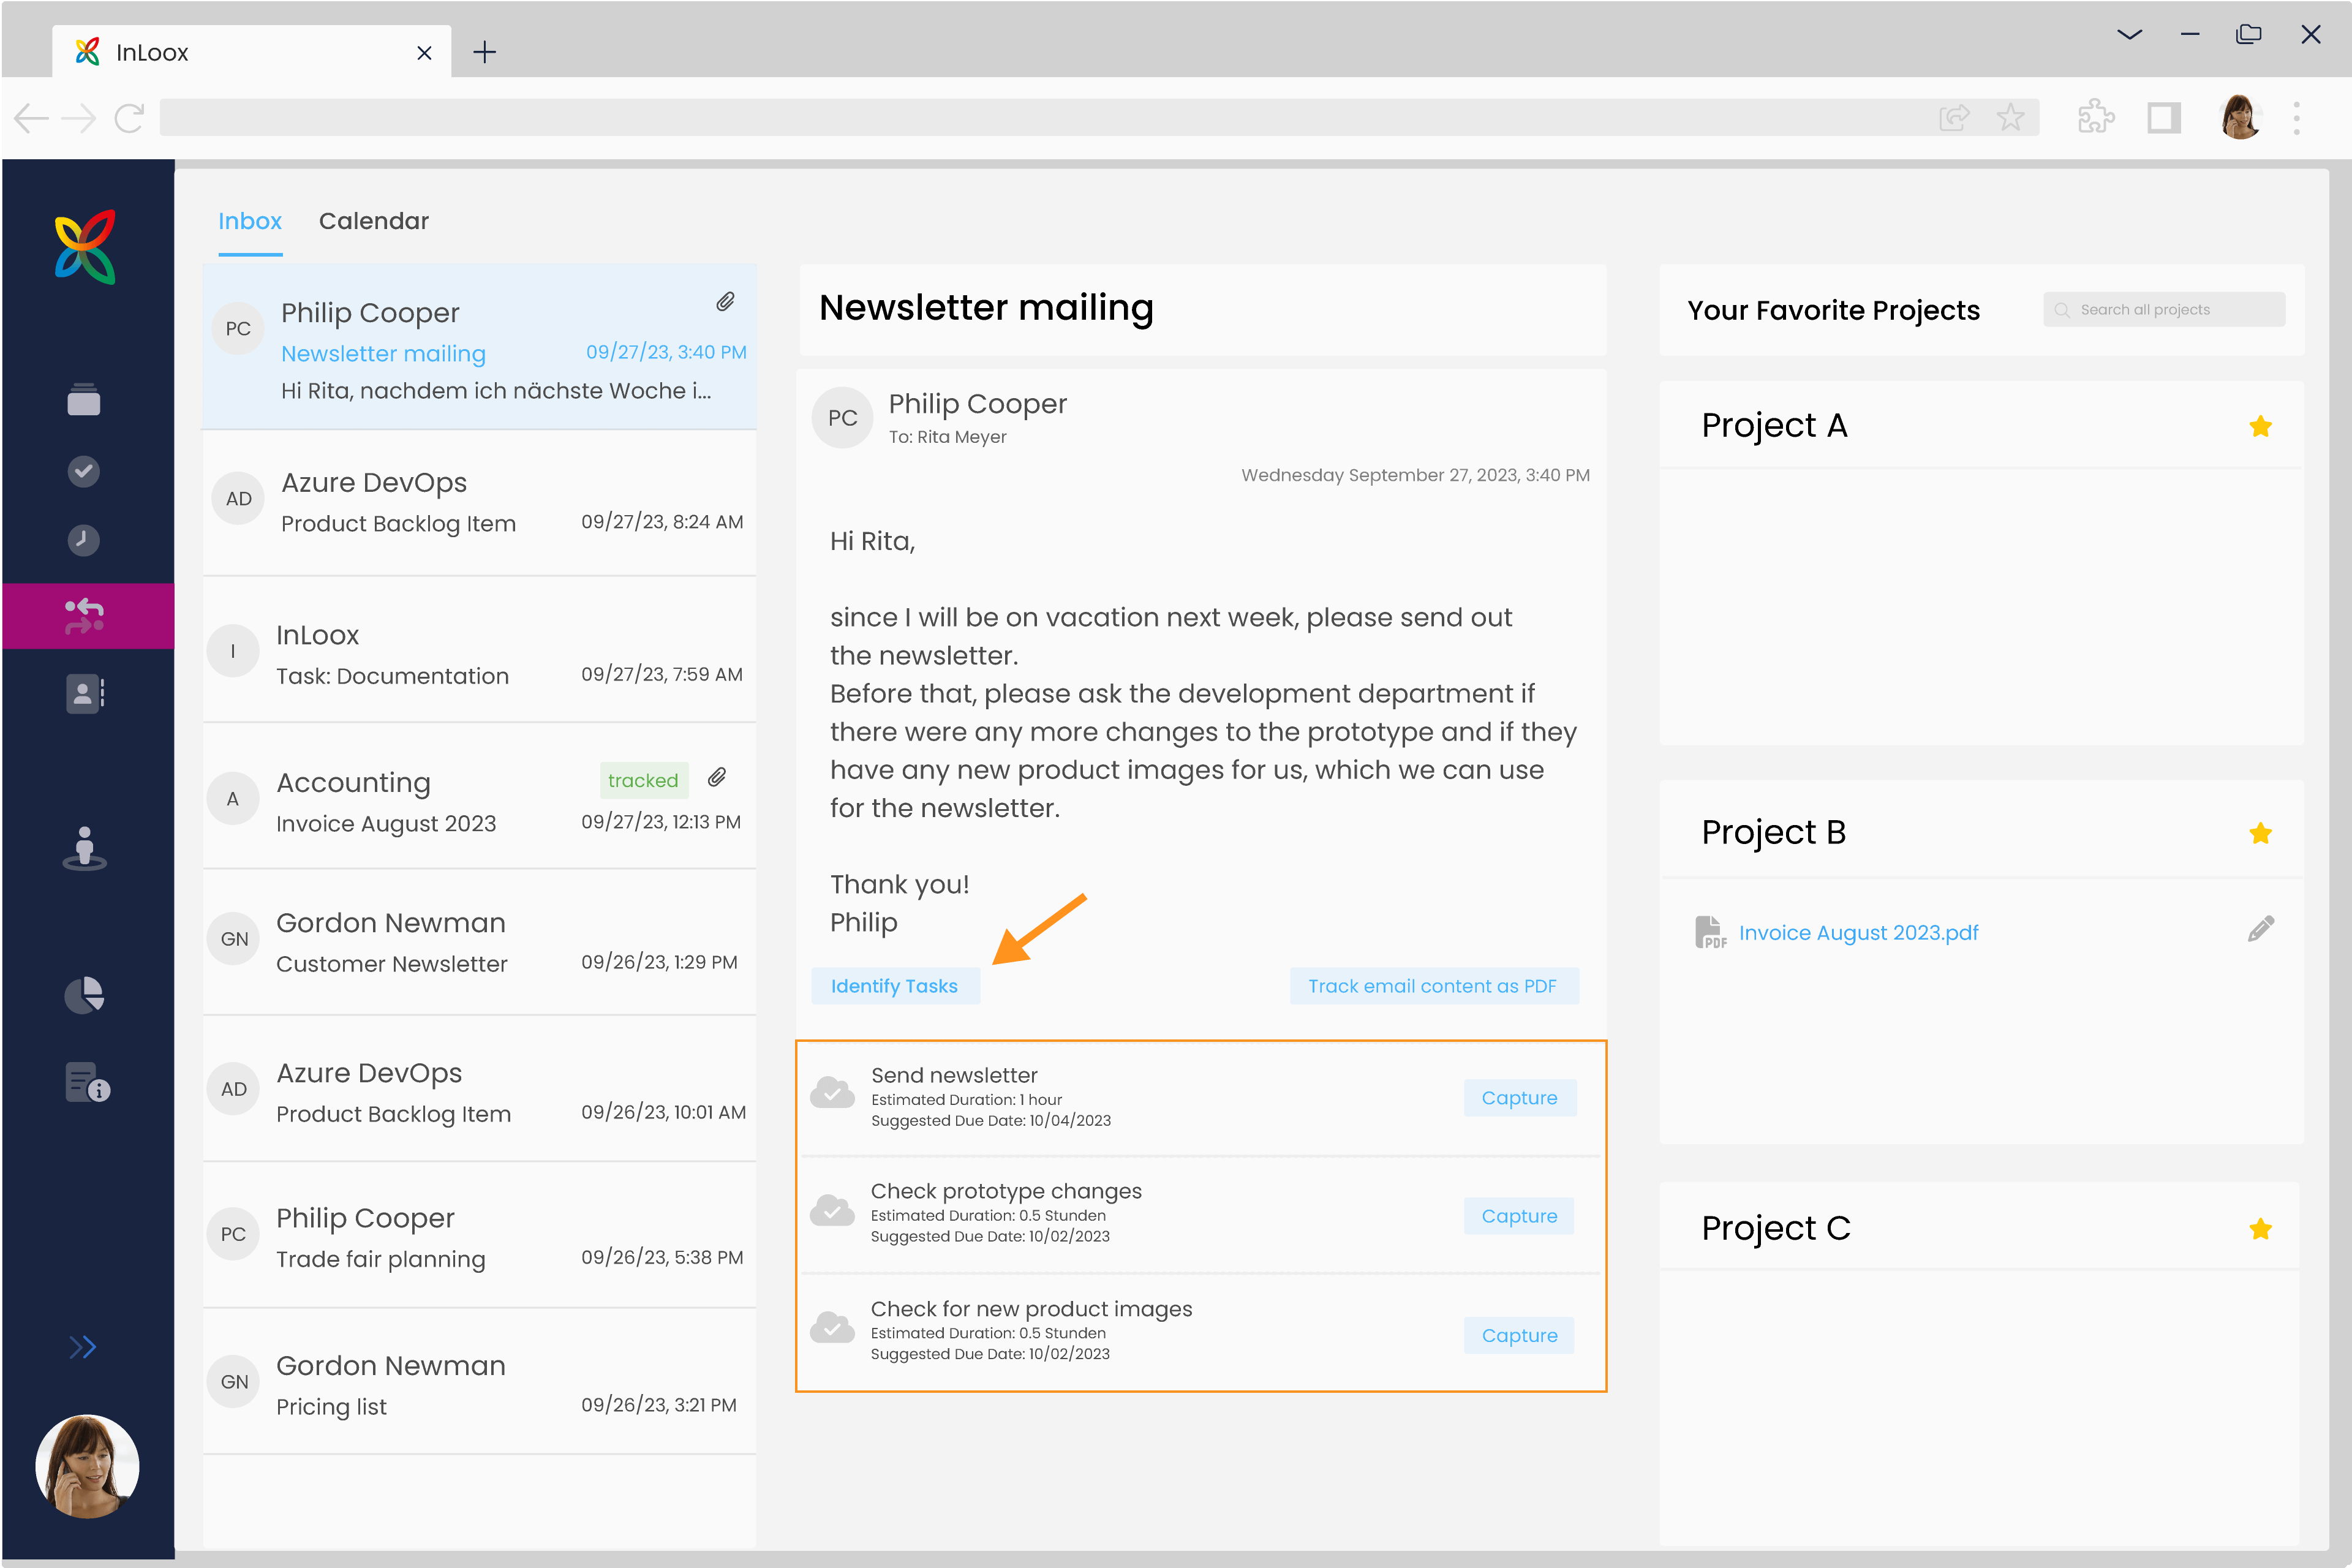
- Click Track in the menu on the left. You will see your Outlook inbox. On the left, you see all your emails, in the center a preview of the selected email, and on the far right your personal project favorites.
- Select the email that you want to turn into tasks.
- Select the appropriate project on the right side.
- Click Identify Tasks so that the InLoox AI scans your selected email and identifies tasks with names, estimated effort, and suggested due dates.
- Select the tasks you want to adopt by clicking Apply. InLoox then generates the project tasks and marks them with a green checkmark.
- Click the task name to open the task and edit the details or assign a resource.
- To hide completed projects from the project list on the right, click the three-dot menu and deactivate Show completed projects.
- To hide tracked items in the project card, click the three-dot menu and deactivate Show tracked items.
Turn Emails into Documents
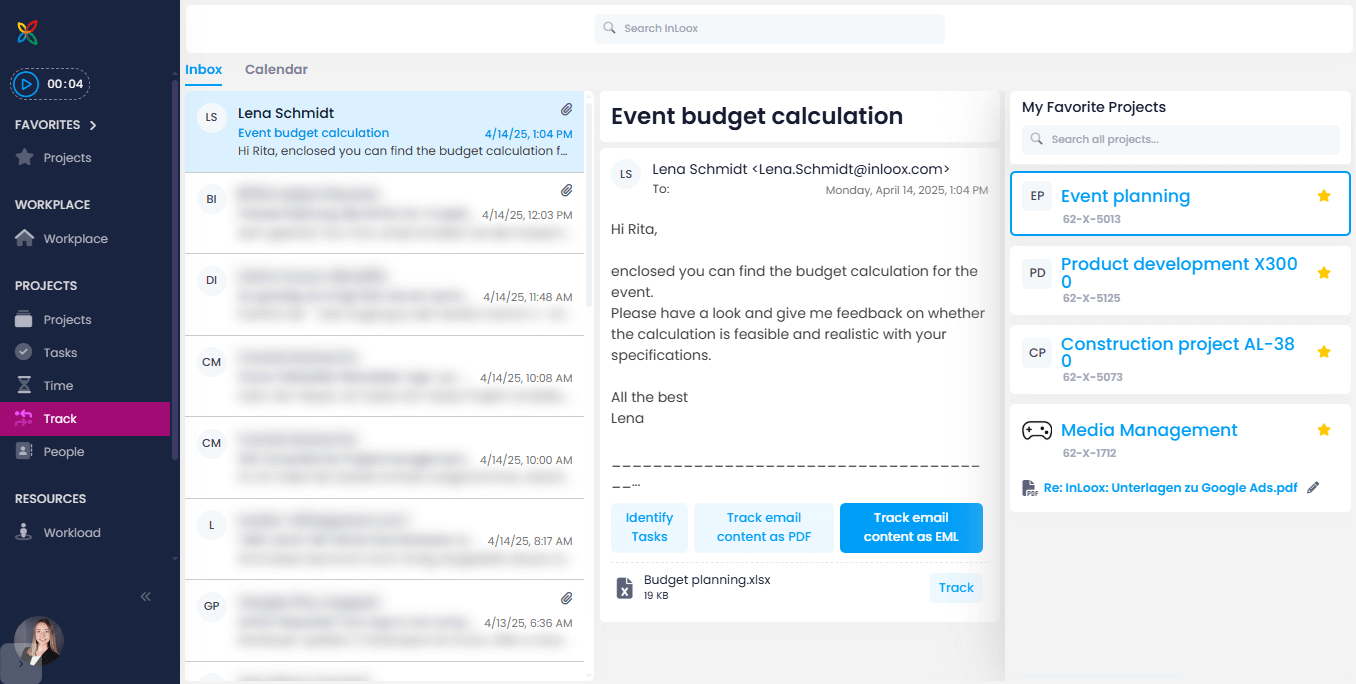
You can save your Outlook emails as documents in PDF or EML format.
- Click Track in the menu on the left.
- Select an email and choose a project.
- Click either Track email content as PDF or Track email content as EML.
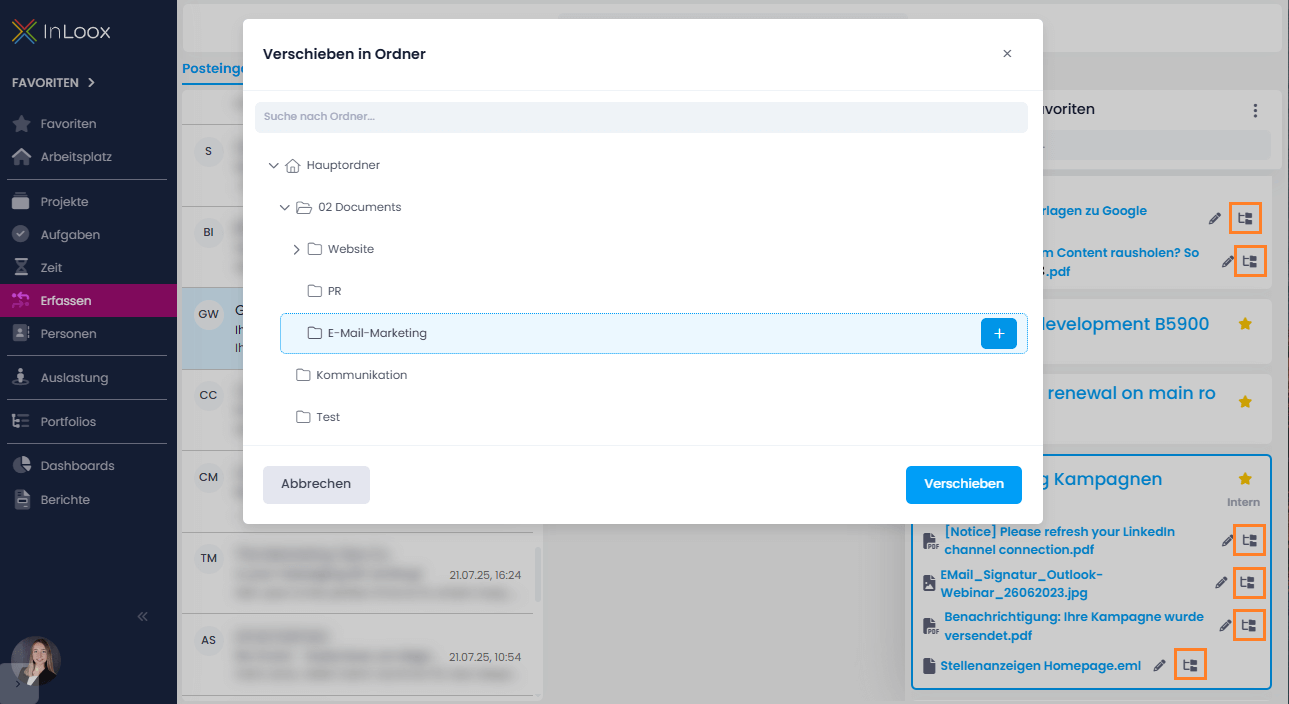
InLoox saves the email in the general documents folder of the selected project. You can then move the filed document to a specific folder if needed. Click the corresponding icon next to the file name. In the dialog that opens, you can select the desired folder or create a new one.
You can now continue using these documents in InLoox and link them with tasks, budget items, or time entries, for example. You can even create connections between multiple projects using bidirectional links.
- To hide completed projects from the project list on the right, click the three-dot menu and deactivate Show completed projects.
- To hide tracked items in the project card, click the three-dot menu and deactivate Show tracked items.
For InLoox to save the new document in a project folder, you must use either the InLoox Cloud Server as your document server, Microsoft SharePoint, or your local file storage. If you receive an error message, verify that your file storage is initialized by opening a project and checking the Documents section. For more information, see the help article on InLoox document settings.
If you use Microsoft SharePoint, you can synchronize your InLoox documents with your SharePoint folders and keep documents up to date. Read the help article on document synchronization.
Track Calendar Entries as Time Entries
You can track calendar entries as time entries in InLoox projects. This ensures that you capture every effort that goes into a project — including phone calls, meetings, or regular status updates that are not tracked as tasks in projects.
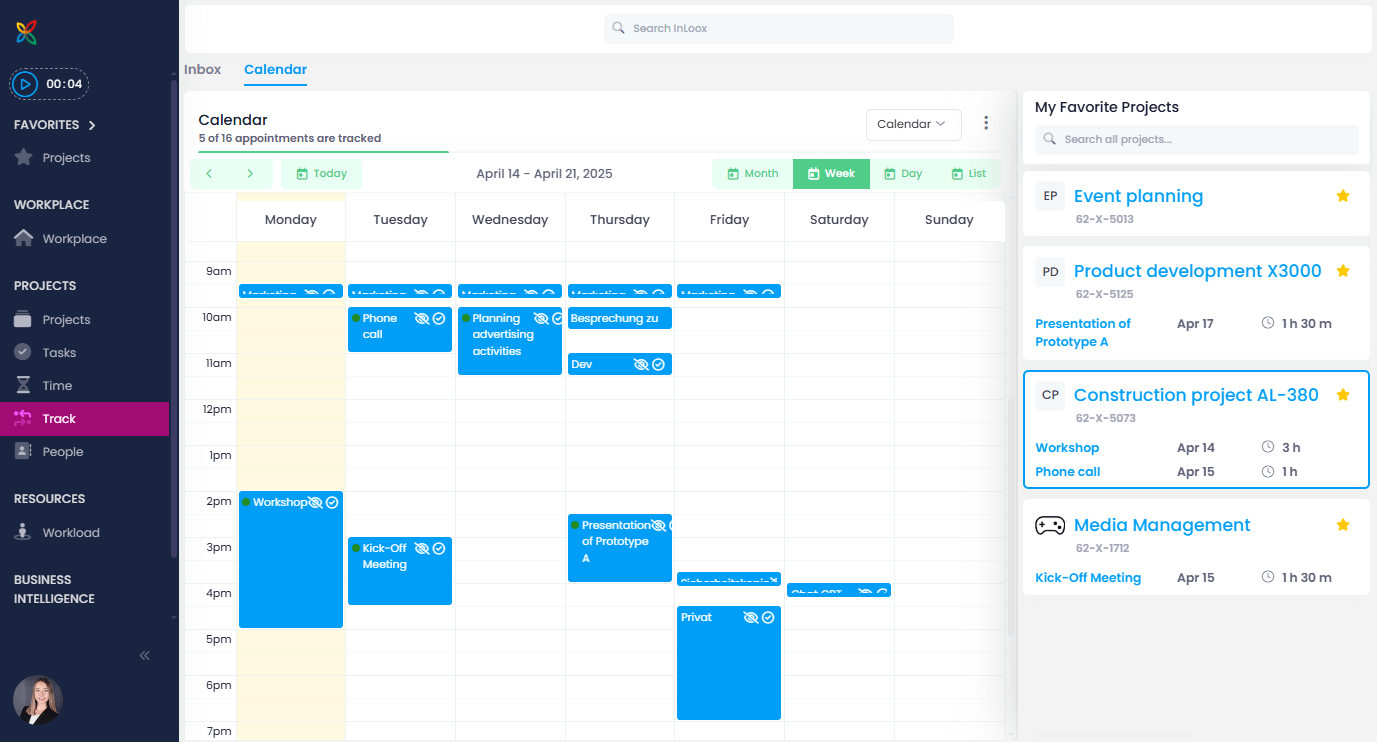
- Click Track and then click the Calendar tab. InLoox loads your Outlook calendar with your appointments.
- To switch to a different calendar, click the Calendar button and select another one. You can also select a calendar shared with you if you have permission.
- Use the buttons above the calendar to navigate and set the time span, e.g. Month, Week, Day. The Today button always takes you to the view where the current day is highlighted in yellow. If you prefer the list view, click the List button.
Track an Appointment
- On the right side, select the project where you want to track time. You will find your project favorites there. Use the search field to find projects that are not yet listed.
- If you are working in the list view, click Track time next to the corresponding appointment. If you are working in the calendar view, click the checkmark icon in the corresponding appointment.
- The time entry input window opens. You can edit the details, e.g. add a description, change the duration, or link the appointment to a project task or an activity of the project’s Gantt chart.
- Close the time entry window by clicking the x in the upper right corner. InLoox saves all details of the time entry automatically.
- The time entry is listed in the project card on the right. Click on it if you want to continue editing the time entry.
InLoox can also mark the calendar appointment with the InLoox category label so that you can see in your Outlook calendar which appointments have already been tracked in InLoox. InLoox displays above the calendar in Track how many appointments from your calendar have already been tracked.
For this to work, you must have connected your InLoox account with your Microsoft 365 account. You must also grant InLoox permission to read and edit your Outlook calendar.
Calendar Settings
On the left side of the calendar, you have various settings. Click the three dots next to the Calendar button:
- Show ignored appointments — When active, ignored appointments are still displayed in the calendar.
- Show private appointments — When active, appointments marked as private in your Outlook calendar are displayed in the calendar.
- Track appointment description — When active, the appointment description is transferred to the time entry description in InLoox.
- Open time entry after creation — When active, the time entry window opens after tracking so you can continue editing the details.
- Set category on appointment — When active, the InLoox category label is automatically added to the appointment in Outlook.
- To hide completed projects from the project list on the right, click the three-dot menu and deactivate Show completed projects.
- To hide tracked items in the project card, click the three-dot menu and deactivate Show tracked items.
- To see all time entries for a project, simply click the project name. InLoox opens the project and under Time you see the complete list of all time entries for that project.