Custom Entities
Custom entities let you model additional business objects in your InLoox Account — for example contracts, machines, or training courses. You can define up to 10 custom entity types and use them as dedicated work areas: an entity type appears as its own entry in the main navigation on the left, as an additional tab inside your projects, or in both places.
Custom entities are only available in the InLoox Enterprise, InLoox Enterprise Plus, and InLoox Self-Hosted editions. They are not available in InLoox Professional.
To configure custom entities, you need administrator permissions for your InLoox Account.
How to open Custom Entities in Account Settings
- In InLoox, click your profile picture in the upper-right corner.
- Click Account Settings.
- In the left navigation, click Custom Entities.
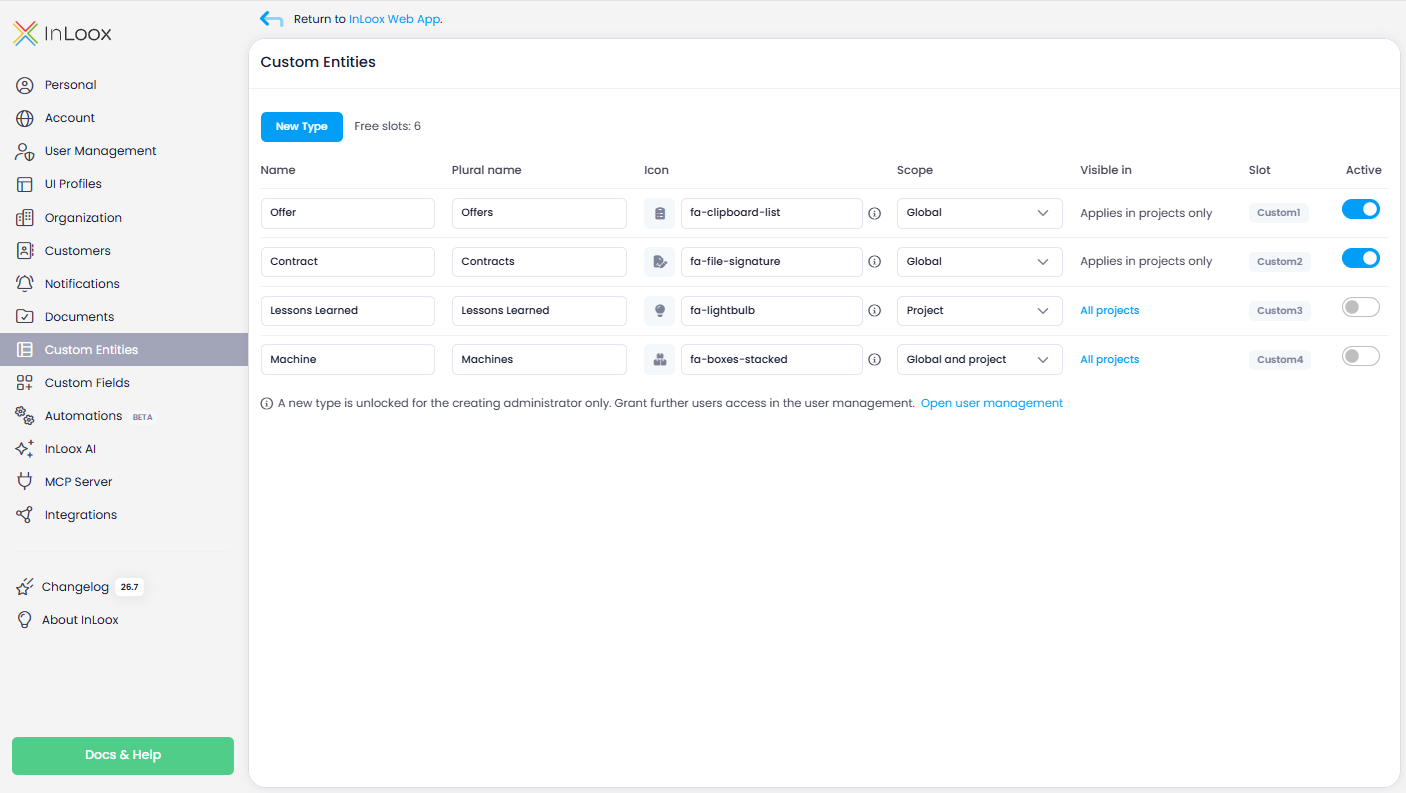
What you can configure
Each custom entity type is one row in the list with the following settings:
- Name — the singular display name of the entity type, for example Contract.
- Plural name — the plural display name, used wherever InLoox lists several entries, for example Contracts.
- Icon — the icon shown for the entity type. Enter the name of a Font Awesome icon, for example fa-cube. A preview of the icon appears to the left of the field.
- Scope — where the entity type appears in InLoox. You have three options:
- Global — the entity type gets its own entry in the main navigation on the left.
- Project — the entity type appears as an additional tab inside your projects, next to Manage, Tasks, Documents, Time, Lists, and the other project areas.
- Global and project — the entity type appears in both places.
- Visible in — the projects in which the entity tab appears: either All projects or a rule that limits the tab to matching projects. Entity types with the scope Global show Applies in projects only here. For details, see How to limit the entity tab to matching projects.
- Slot — the storage slot the entity type occupies. InLoox assigns the slot automatically; it cannot be changed.
- Active — turn the entity type on or off for the users in your Account. A new entity type is created in an inactive state.
Above the list, next to the New Type button, you see how many free slots are still available.
Custom entity types cannot be deleted, and deactivating a type does not release its slot. Your Account has 10 slots in total. If you no longer need an entity type, rename it and reuse its slot for a different purpose.
How to create a custom entity type
- Open Account Settings > Custom Entities.
- Click New Type above the list.
- InLoox adds a row with the default name New custom entity and places the cursor in its Name field with the name selected, so you can type the new name straight away. The name is saved as soon as you leave the field.
- Complete the remaining settings of the new row — plural name, icon, scope, and the projects the entity tab should appear in. For the icon, enter the name of a Font Awesome icon.
- Turn on the Active toggle to activate the entity type.
Initially, only you as the creating administrator can work with the new entity type. To give other users access, assign the permissions for custom entities.
Until you activate a new entity type, it stays out of the navigation, the project tabs, and Custom Fields. The New Type button is disabled while no free slot is available.
Add custom fields to a custom entity
A custom entity type only becomes useful once you define which information it stores. You do this with custom fields:
- Open Account Settings > Custom Fields.
- Select your custom entity type. Active entity types appear there as additional areas, alongside the built-in areas such as projects and tasks.
- Create sections and custom fields the same way you would for any other area — all field types are available.
This way you can model scenarios that are specific to your company, industry, and use case — for example a Contract entity with fields for contract number, term, and contract value, or a Machine entity with fields for inventory number, location, and next maintenance date.
Permissions for custom entities
Every active custom entity type gets its own row in the permission settings, listed under Custom entities. Inactive entity types are not shown.
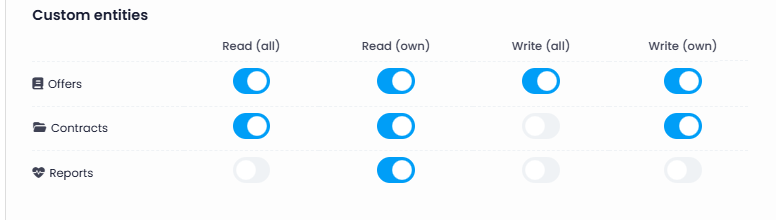
Each entity type has four permission switches:
- Read (all) — read all entries of this entity type.
- Read (own) — read only the entries the person created.
- Write (all) — create, edit, and delete all entries of this entity type.
- Write (own) — create, edit, and delete only the entries the person created.
When you create an entity type, InLoox automatically grants you, as the creating administrator, these four permissions on the Global level, so you can start working with it right away. Your other users get access only after you grant it to them — the Open user management link under the list of entity types takes you there directly.
You can assign these permissions on all three permission levels in Account Settings > User Management:
- As global user permissions on the Global tab, so that they apply to a person across the entire Account.
- As role permissions on the Roles tab, so that they apply to everyone holding that project role.
- As division permissions on the Divisions tab, so that they apply to the projects of the selected division.
Entity types with the scope Global are not listed on the Roles tab, because role permissions only apply to entries that belong to a project.
As with all InLoox permissions, the levels are cumulative — a person receives their global permissions as a baseline, extended by any role and division permissions. For details, see Permissions.
For entity types with the scope Project or Global and project, InLoox checks the permissions in the context of the respective project. Role and division permissions can therefore show the entity tab in a project and allow creating or editing entries there, even if the person has no global permission for the entity type. If the entity type has a visibility rule, the tab only appears in projects that match the rule.
In the main navigation, only the global permissions for custom entities apply.
How to limit the entity tab to matching projects
By default, the tab of an entity type appears in every project where a person has read permission for it. You can limit the tab to projects that match a rule you define on the project fields — for example, so that a type only appears in the projects of one division or of a certain project category. A rule is only available for entity types with the scope Project or Global and project.
- Open Account Settings > Custom Entities.
- In the Visible in column of the entity type, click All projects or the text of the existing rule. The Visible in which projects? window opens.
- Select one of the following options:
- All projects — the tab appears in every project where the person has read permission.
- Only matching projects — the tab only appears in projects that meet your conditions.
- For Only matching projects, build the conditions the same way you build a display rule for a custom field: combine single conditions and groups with And, Or, Not And, and Not Or. The available fields are Project Name, Project Number, Customer, Customer Number, Division, Project Status, and Project Categories, plus the custom fields of the project area.
- Check the preview under the conditions. It shows how many projects currently match the rule and names up to three of them. A condition that compares two fields with each other cannot be previewed — InLoox evaluates it on the project that is open.
- Click Save.
The Visible in column then shows the rule in words, for example Project Categories contains "Sales". Click the text again to change the rule or to switch back to All projects.
If an entry belongs to a project that stops matching the rule — for example because the project status changed — the tab disappears from that project. The detail view of the entry then shows a warning under the project selection in the Belongs to section.
The rule only controls where the tab appears — it does not restrict access to the data. Entries in projects that don't match the rule stay reachable through the list of the entity type and through search. To protect data, use the permissions for custom entities.
If a condition refers to a field that has since been deleted, InLoox ignores the rule and shows the tab in every project, so that nothing is hidden by mistake.
Views in the custom entity list
The list of an entity type with the Global scope has the same view management you know from the task list. In the toolbar, use the View selector to switch to a saved view. The menu offers these options:
- Save as New View — stores the current columns, grouping, and filters under a new name.
- Save This View — updates the selected view with your changes.
- Manage Views — renames a view, makes it available to all users, deletes it, or downloads and uploads it as a
.jsonfile.
Every entity type has its own views. A view you saved for one entity type never appears in the list of another entity type, and views of custom entities never appear in the project list. InLoox remembers the view you selected for an entity type and restores it when you open the list again.
The list of an entity type in the project tab has no saved views. Its column selection and grouping are only stored in your browser.
For details, see Save, Manage, and Publish Views and Import & Export Views.
Documents on global custom entities
Entries of a custom entity with the Global scope can have documents without a project assignment, just like private tasks. Upload documents directly on the entry or link existing private documents.
When you assign the entry to a project, InLoox moves its private documents into the project's document storage. After documents are linked, you cannot change or remove the entry's project assignment.
Related settings
- Use Custom Fields to add additional fields to your entity entries.
- Use Permissions to control who can read and edit custom entities.
- Use Automation to run rules when entries of a custom entity type are created, changed, deleted, or commented on.